You can install this app on your Apple Silicon Mac(M1, M2...). Please note that this cannot be installed on an Intel Mac.
This app supports only AUv3 plug-in format. It can be used with AUv3-compatible DAWs. Other plug-in formats are not supported.
Before using an AUv3 format plug-in in a DAW, launch the app as a standalone, to ensure that it initializes correctly.
If you have an AUv3 plug-in that does not appear in your DAW's AUv3 plug-in list, try the following steps

In the selection UI consisting of lamps and button(s), you can change the selection not only by using the button(s) but also by dragging.
The sound is not affected during selection by dragging. When you touch up, the drag selection will be reflected in the sound.
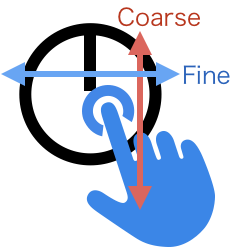
By dragging horizontally, you can finely adjust the parameter values.
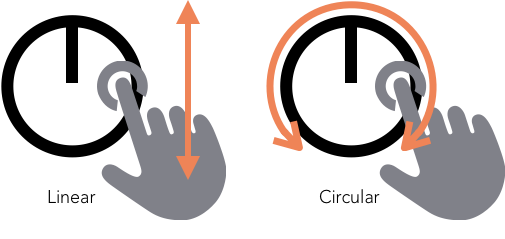
This function is not available when "Rotary Knob mode" is set to "Circular".
A quick double tap will restore the parameter value to its default value.

You can change the operation method of the rotary knob on the setting screen.
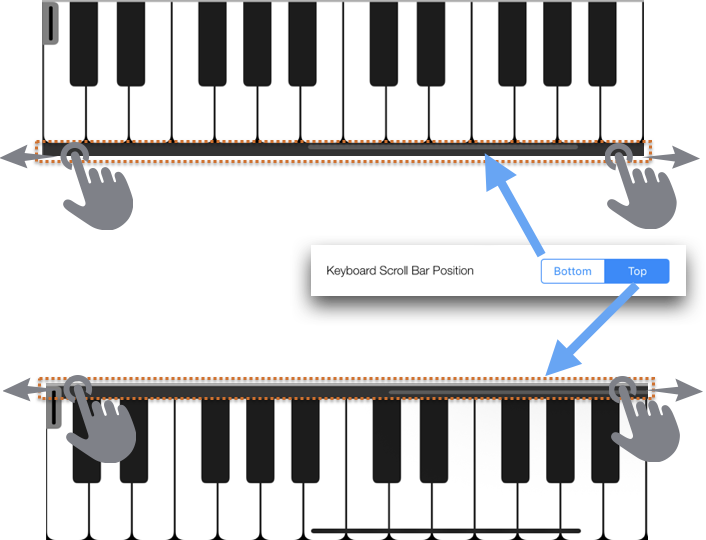
The keyboard displayed when running as a stand-alone App can be moved by dragging the keyboard scroll bar.
When running as a plug-in (AUv3), there is no keyboard.
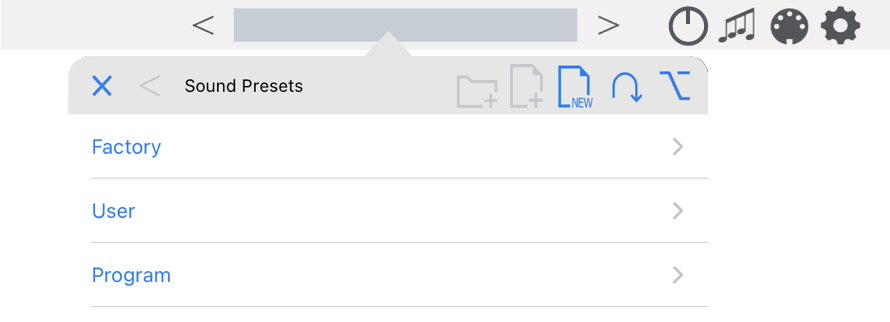
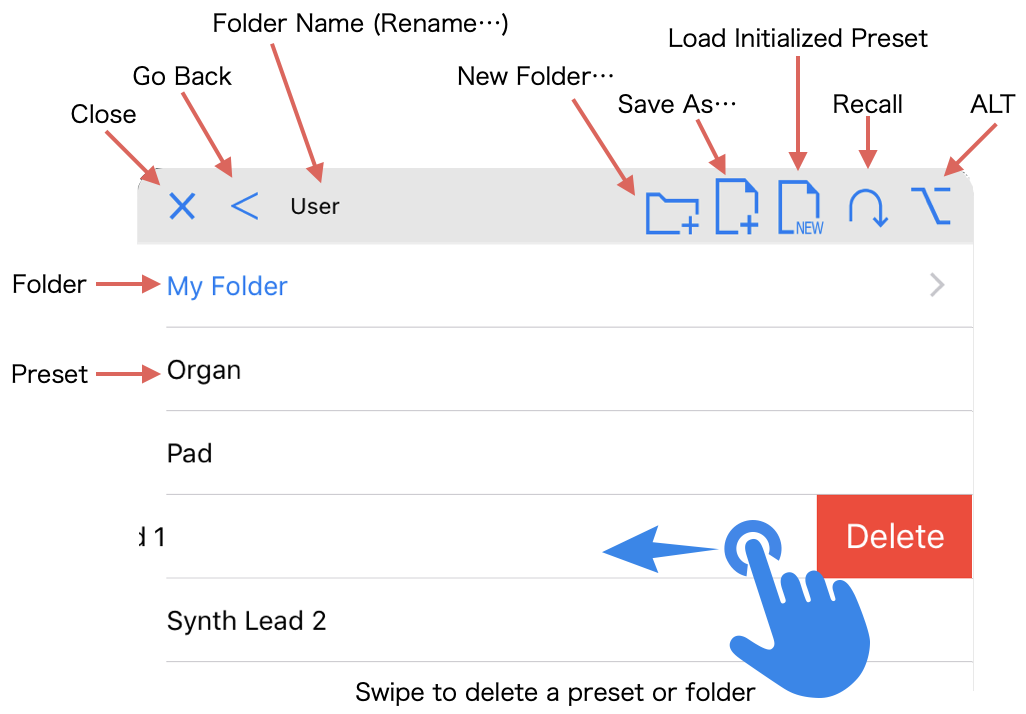
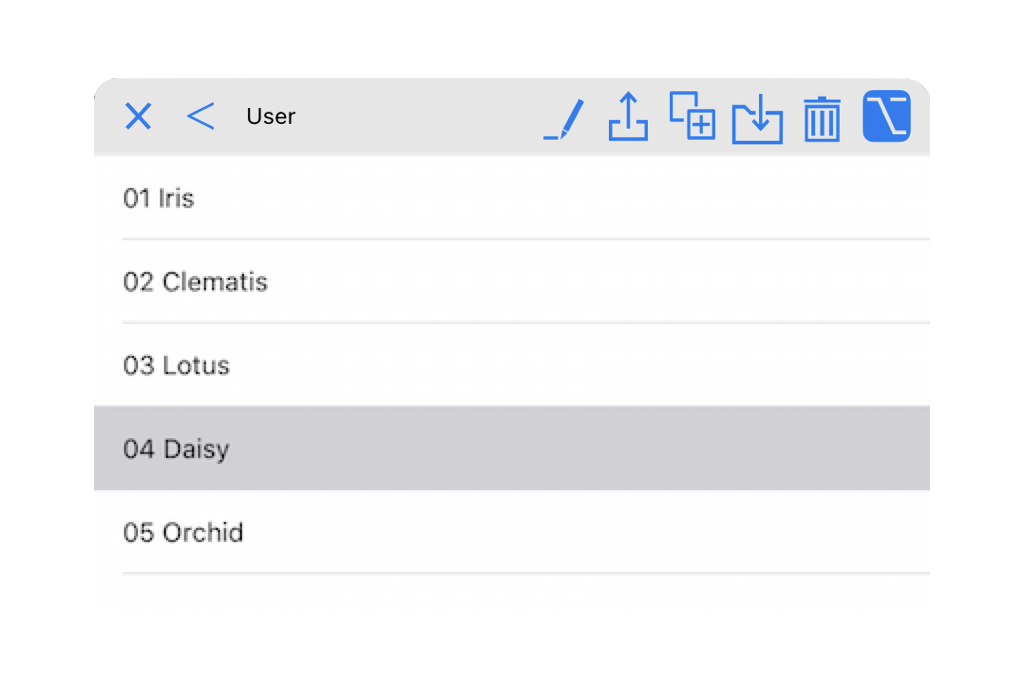
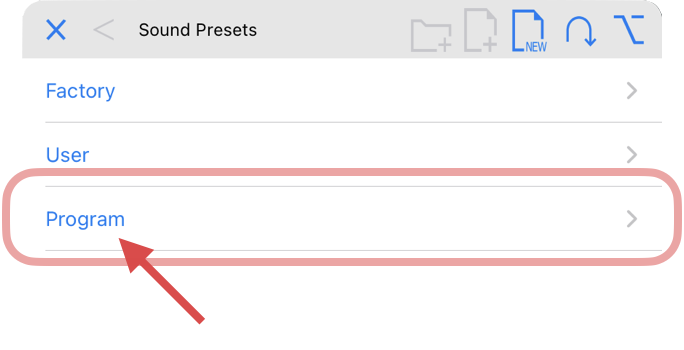
When you first open the preset browser, you will see three folders: Factory, User and Program.
The display order in the preset browser is sorted in alphabetical order, with numbers from 0 to 9 first, then capital letters A to Z, and finally a to z. Therefore, you can sort the order by putting a number before the name.
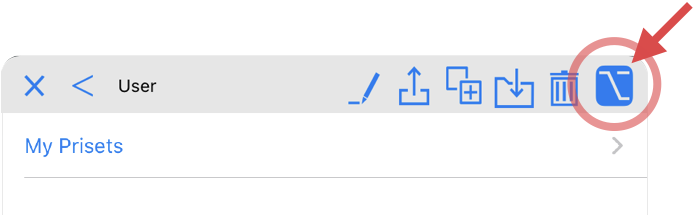
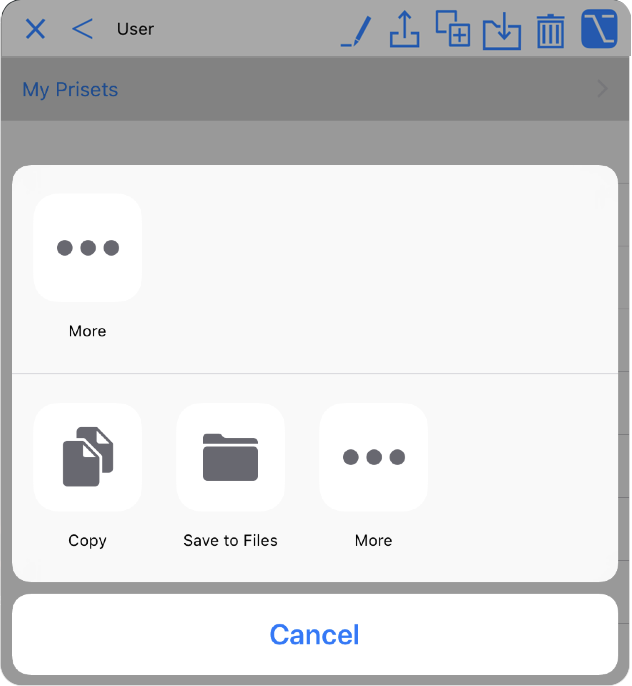
You can share your presets with other users.

You can import presets exported in the previous method into the user presets folder.

In the case of the File App, simply tapping on it will launch the standalone App and import it into the "User" folder.
In the "Programs" folder you can define which presets will be loaded when a MIDI program change message is received. The program number corresponds to the order of the sound preset in the "Program" folder.
You can sort the order of the program number by putting a number before the name. → Display order of presets
The presets stored in this folder can also be displayed in the preset list of the AUv3 host. On the settings screen, you can choose to display the factory presets or the contents of the program folder.


When you launch version 2 of the APP for the first time, a folder named "(Old Version Presets)" is created in the "User" folder, and the preset made with the old version is copied into this folder. This process will not be executed even if you launch it as AUv3 plugin.
If the old version preset does not appear in the "User" folder, please try the following.
About File Sharing on iPhone, iPad, and iPod touch (https://support.apple.com/kb/HT201301)
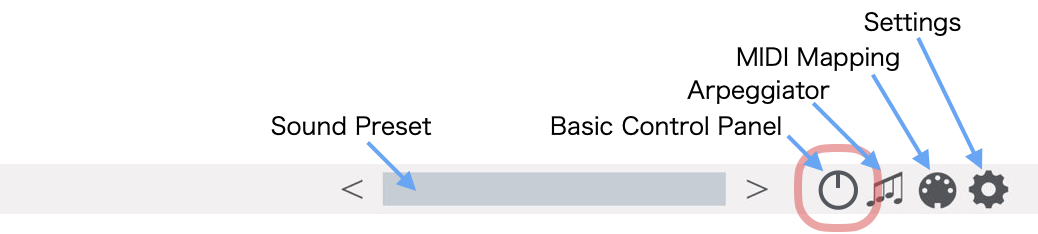
When instantiated as a plugin, the Basic control panel can be opened using the knob button in the header.
The settings of the Basic control panel are saved in the sound preset.
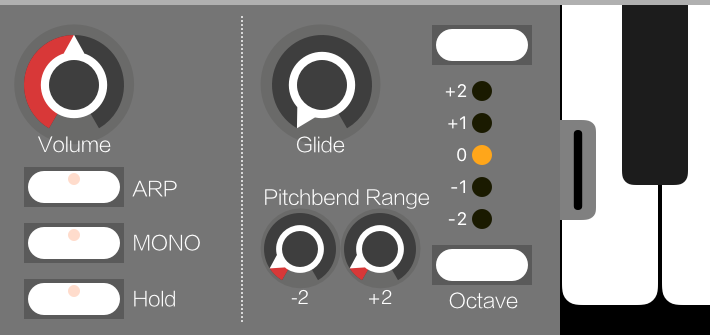
Master Volume
Arpeggiator ON/OFF switch
MONO mode limits the number of notes sounded simultaneously to 1.
At the timing of the second note on, the Envelope enters the Attack phase, retaining its current value.
The Envelope continues to run after the second note-on.

Keyboard Hold ON/OFF
→ You can switch the mode of the keyboard hold function on the setting screen.
adds a sliding pitch transition between notes that are played consecutively.
Specifies the Pitch Bend Range in semitones.
can transpose pitch up or down in one-octave steps.
You can open the settings screen by tapping the gear icon on the top right of the screen.

NOTE: On the plug-in mode setting screen, only the items that can be set are displayed. This image is the setting screen when launched as a standalone app.
When notes get stuck, you can kill all notes currently playing by tapping this button.
This setting is not affected by changing the sound preset.
This setting is not affected by changing the sound preset.
Setting range: -12 semitones to +12 semitones
This setting is not affected by changing the sound preset.
Setting range: -100 cents to +100 cents
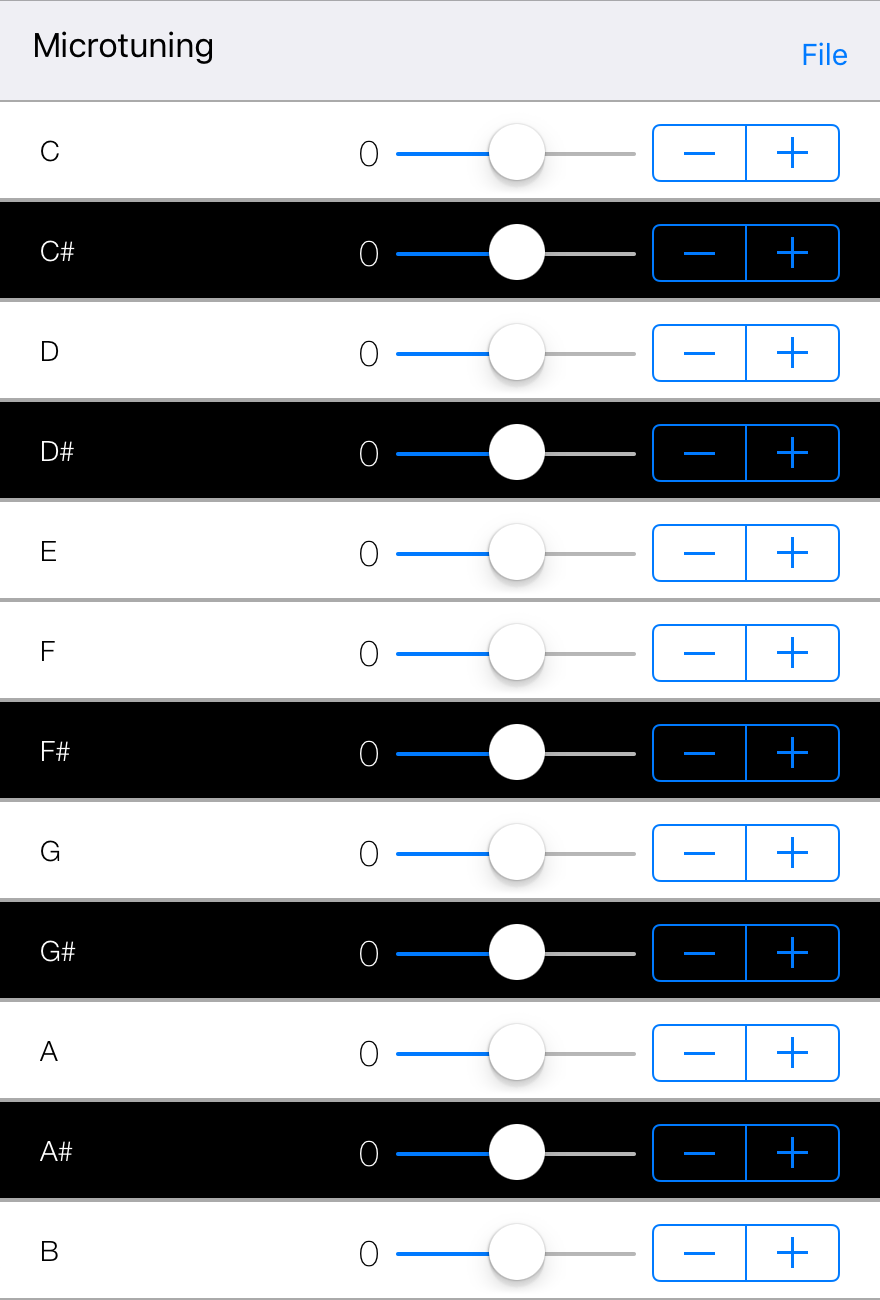
You can change the equal temperament tuning scale to a different tuning.
You can set how much the 12 notes within an octave are shifted from the mean in 1-cent increments. Each note has a tuning range of -100 to +100 cents, and this tuning is repeated for each octave.
The tuning set here can be saved for use in other presets. The file is saved in a proprietary format. Files in other formats cannot be imported.
You can adjust the maximum simultaneous polyphony from 1 to 32 voices. Lowering the maximum simultaneous polyphony setting will reduce CPU usage.
You can set the synchronization method of the arpeggiator and sequencer.
When the synchronization method is internal sync, you can change the tempo of the arpeggiator and sequencer.
Adjusts the beat shift when synchronizing tempo.
The audio buffer size affects the amount of latency and the CPU usage. Higher setting will reduce crackling noise at high CPU usage, but also cause more latency.
If background audio is enabled, this app will consume battery power significantly even if other apps are running or if your screen is turned off.
You can set which MIDI input port to receive.
When the OMNI is OFF this app will receive only on the currently selected channel.
You can connect Bluetooth MIDI compatible controllers.
You can save/load MIDI mapping settings.
As soon as you operate the MIDI controller, it will be reflected to the parameter. If the MIDI controller value and the parameter value are different, the parameter value will jump.
If the MIDI controller value is different from the parameter value, the parameter value will not be changed until the MIDI controller value crosses the currently set parameter value. However, even in this mode, if the MIDI controller is operated when the parameter value is out of the range set by the MIDI mapping, the set parameter value jumps to the boundary value of the range.
ON: Save the arpeggiator settings in the sound preset file.
OFF: Save the sound preset file without including the arpeggiator settings.
ON: If there are arpeggiator settings in the sound preset file, it will be loaded. If there are no arpeggiator settings in the sound preset file, the current arpeggiator settings will not change.
OFF: Even if there are arpeggiator settings in the sound preset file, it will not be loaded.
ON: Save the MIDI mapping settings in the sound preset file.
OFF: Save the sound preset file without including the MIDI mapping settings.
ON: If there are MIDI mapping settings in the sound preset file, it will be loaded. If there are no MIDI mapping settings in the sound preset file, the current MIDI mapping settings will not change.
OFF: Even if there are MIDI mapping settings in the sound preset file, it will not be loaded.
ON: Save the microtuning settings in the sound preset file.
OFF: Save the sound preset file without including the microtuning settings.
ON: If there are microtuning settings in the sound preset file, it will be loaded. If there are no microtuning settings in the sound preset file, the current microtuning settings will not change.
OFF: Even if there are microtuning settings in the sound preset file, it will not be loaded.
How to operate the knob Switches between linear mode and circular mode.
Sets the width of the keyboard.

Sets the position of the bar for side-scrolling the keyboard.
Set whether to use pop-up display when running as AUv3. If this is set to OFF, the screen will not close even if you interact with the UI of the host app. Turn it off if you want to adjust the tone while playing the keyboard of the host app.
When one or more keys are pressed while no keys are pressed, the held notes are released and the newly pressed notes are held. Hold notes can be added by pressing keys while holding down the keys. This mode is useful for keyboardists using the arpeggiator by repressing chord keys.
Toggles Hold Note on/off each time you press the keyboard.
Display version information, license information, etc.
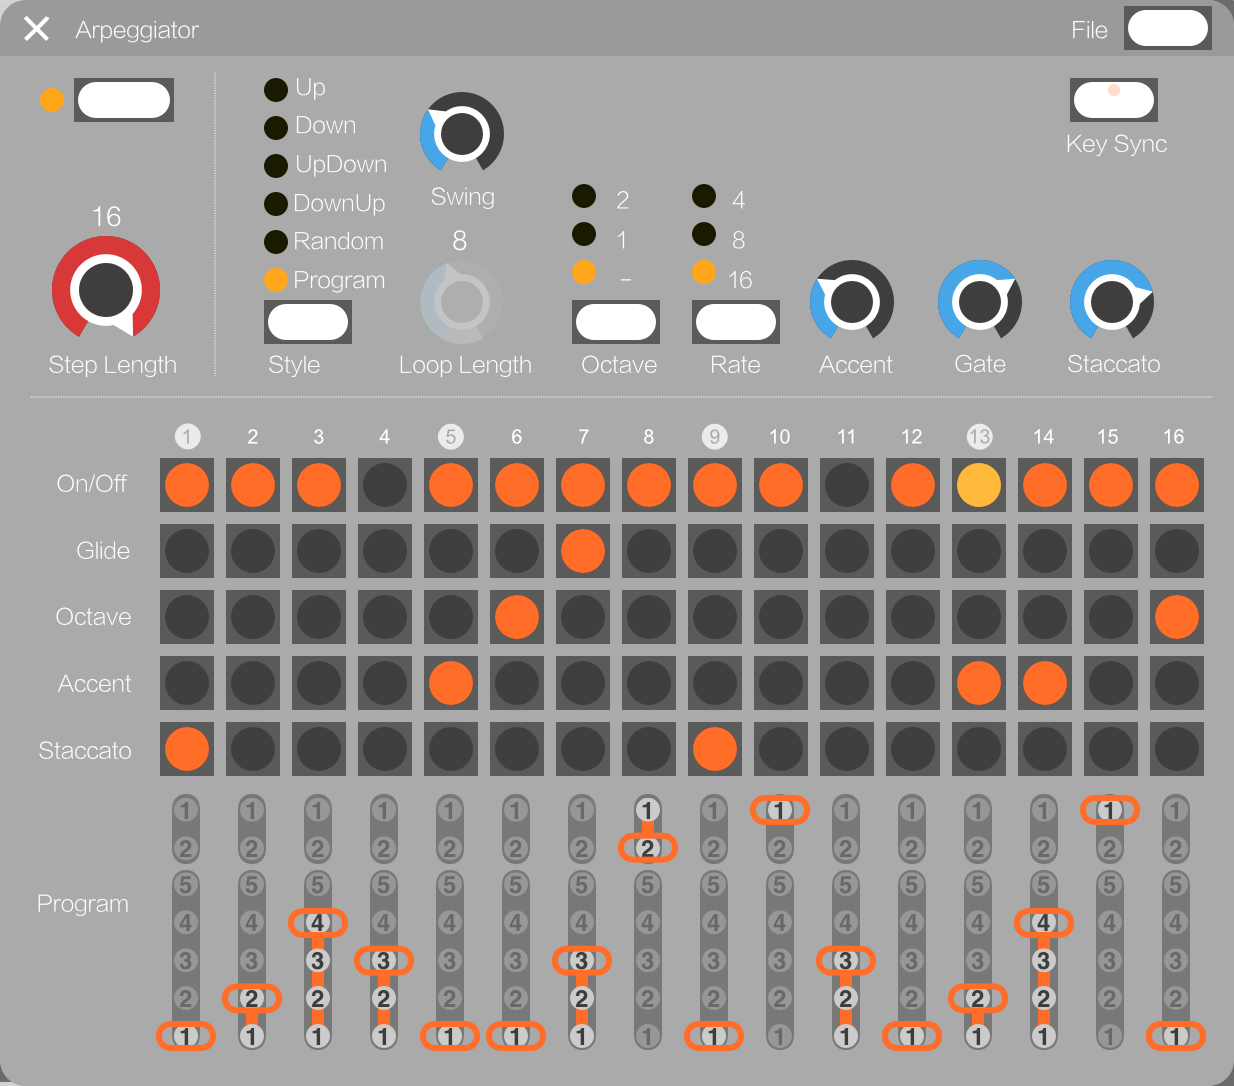
The arpeggiator rhythmically disperses MIDI signals from the host app or pressed chords from the on-screen keyboard. If you input a single note, the input single note will be repeated. When multiple notes are input at the same time, they are rhythmically dispersed as an arpeggio. Unless you use the "Hold" function, the arpeggiator will work only between note ON and OFF.
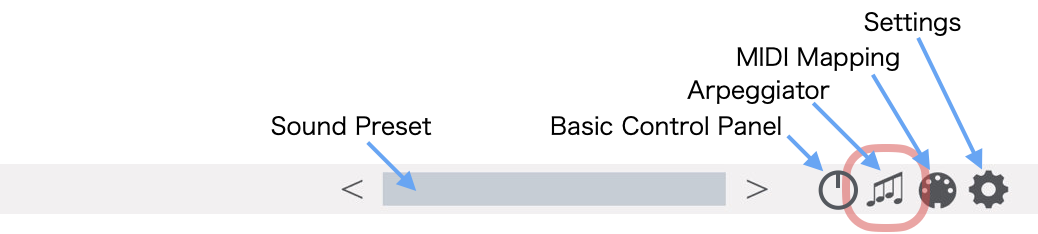
You can open the settings screen by tapping the musical note icon on the top right of the screen.

| Notes held | C,E,G |
|---|---|
| Loop Length | 8 |
| Result | CEGCEGCE/CEGCEGCE/... |
| Notes held | C,E,G,B |
|---|---|
| Loop Length | 3 (less than the number of notes held) |
| Result | CEG/CEG/CEG/CEG/CEG/... The fourth note, B, does not appear in the arpeggio. |

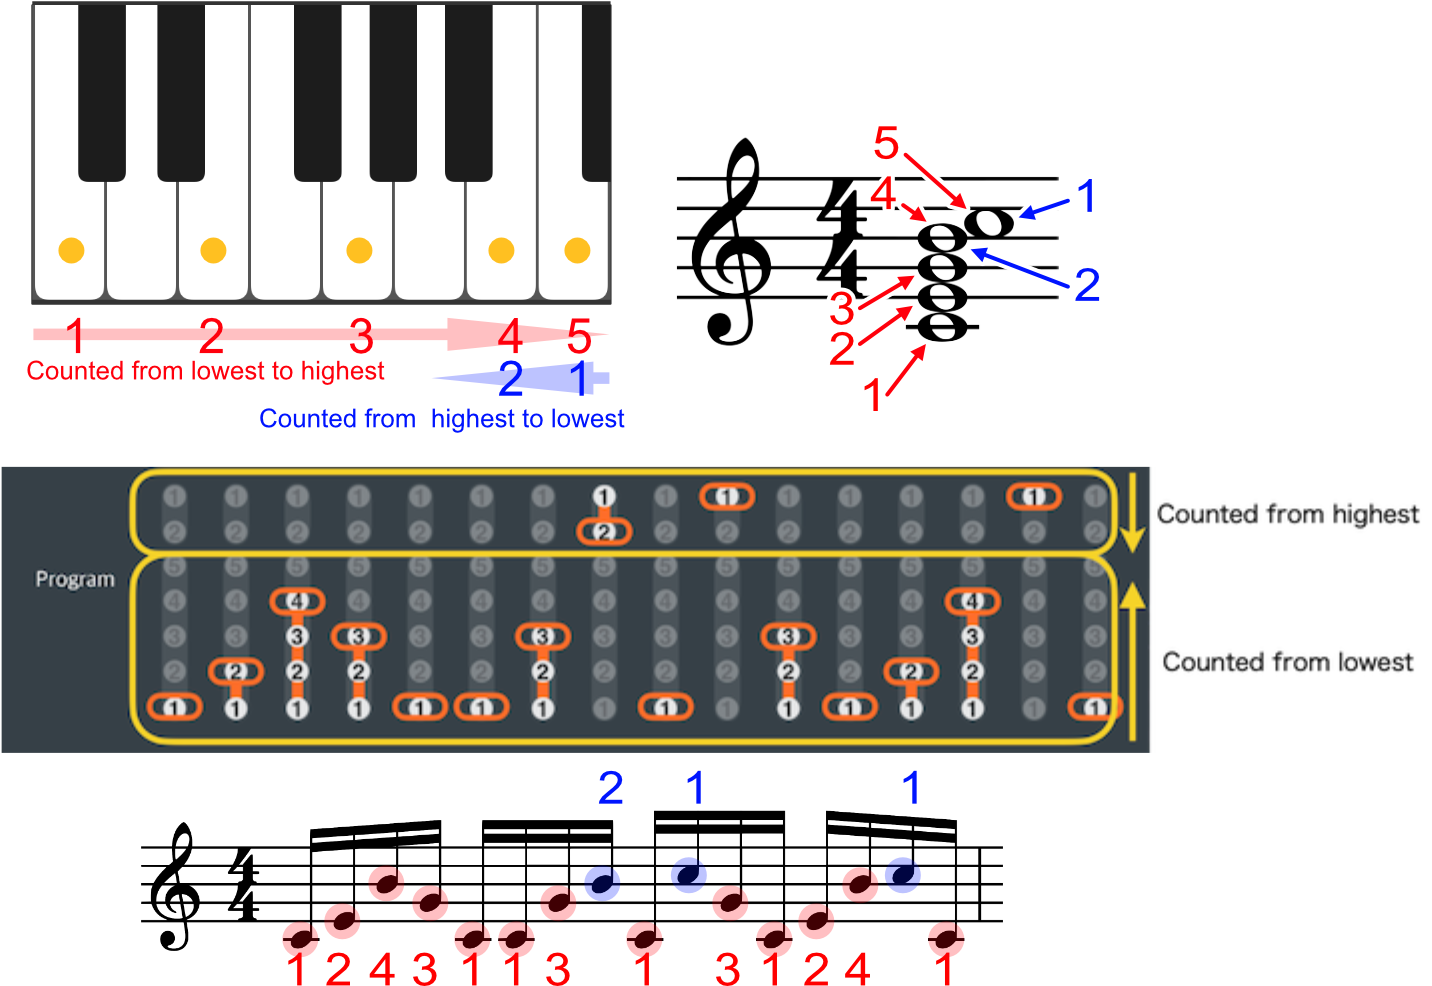
The program row can be used when the style is set to "Program". It specifies which of the held notes on the keyboard will be played.

The upper row sets the number of the note to be played counting from the top of the note-on state, and the lower row sets the number of the note to be played counting from the bottom.
Imagine a style of playing in which the left hand holds the chord and the right hand plays the melody-like moving notes that appear in the arpeggio. If there is a way to count from the top, there is always a way to include the notes added by that right hand in the arpeggio. With the counting from the bottom method, it is impossible to locate the notes held by the right hand because the left hand does not know how many notes it will hold. Therefore, there are two ways to count from the top and two ways to count from the bottom.
When seven or more notes are held down, no notes other than five from the bottom and two from the top can be included in the arpeggio.
When you hold down C3,E3,G3,B3,C4 keys, C3 is 1st note, E3 is 2nd note, G3 is 3rd note. B3 is 4th note. C4 is 5th note.
Arpeggiator settings can be saved separately from sound presets. The saved arpeggiator settings can also be used with other iceGear synthesizers.
You can assign the MIDI controller knobs to the parameters.

In MIDI learning mode, Press and hold the knob or other control to open the setting panel.
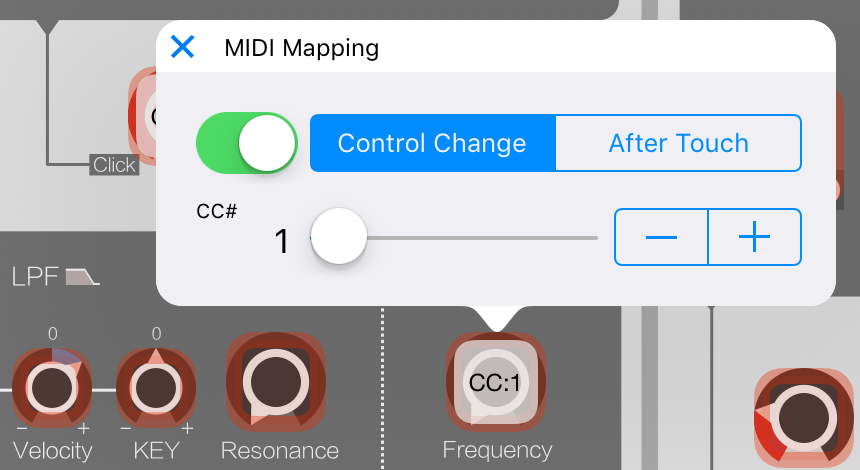
To delete the assigned MIDI mapping, tap the control several times.
In the "MIDI 1.0 Control Change Messages" defined by the MIDI Association, controller numbers 120-127 are reserved for channel mode messages. Parameters cannot be mapped to these controller numbers reserved for channel mode messages.
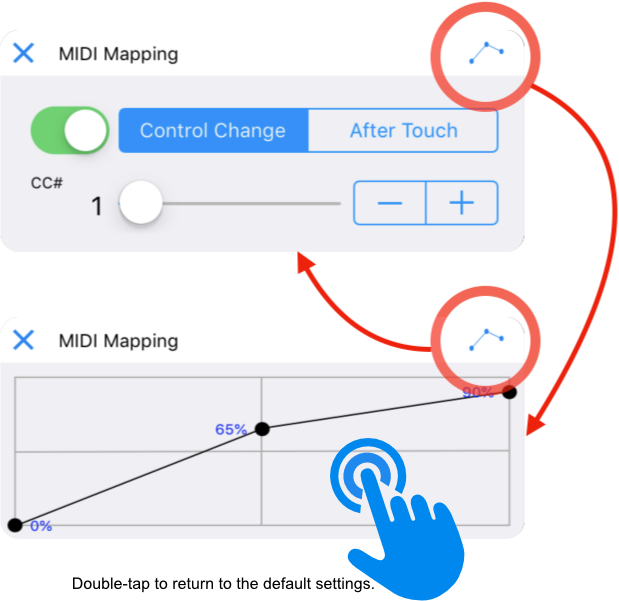
The value given by the MIDI controller can be changed to a different value.

You can save the created MIDI mapping from the setting screen.
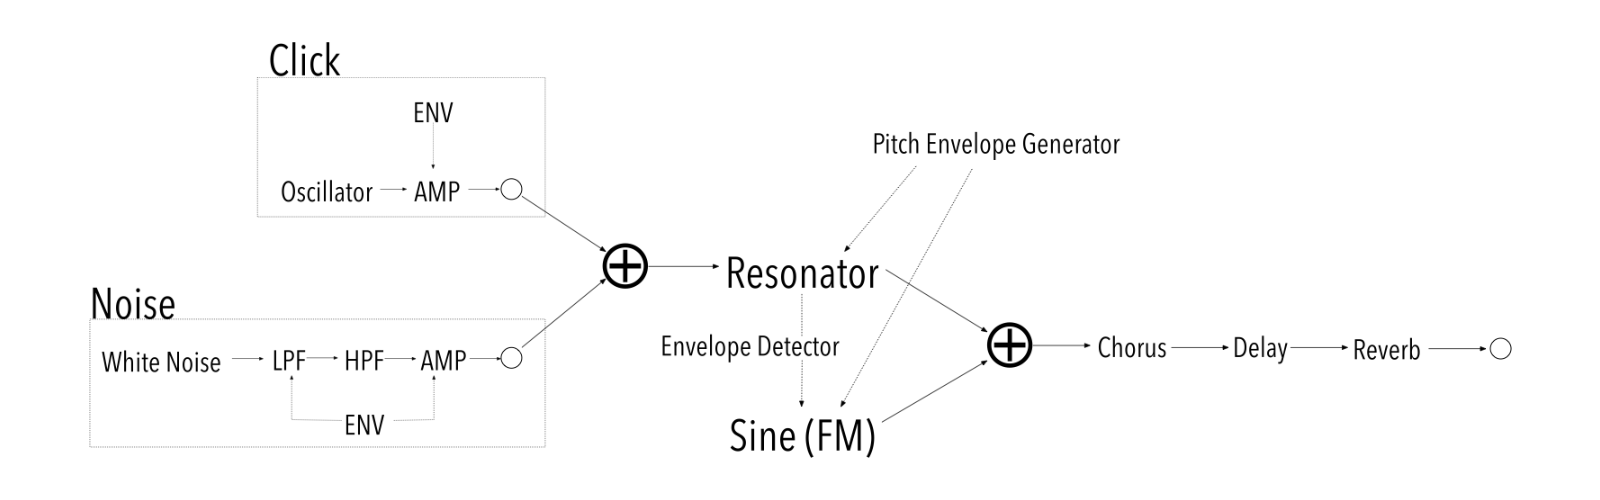
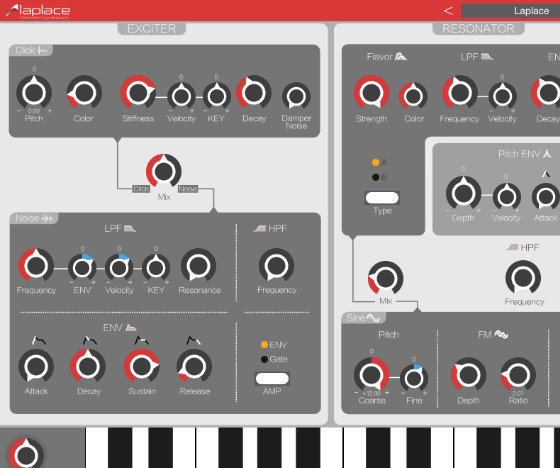
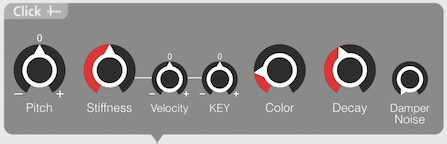
The Click section makes percussive impulses.

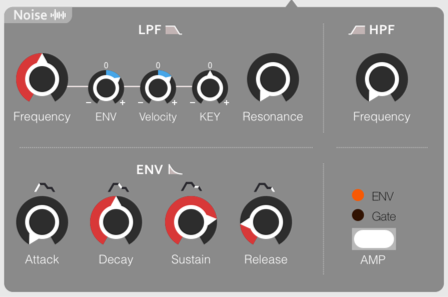
The Noise section makes bowing noise and blowing noise.


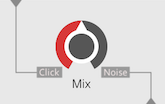
Mix: Adjusts the amplitude of click/noise sent to the resonator.
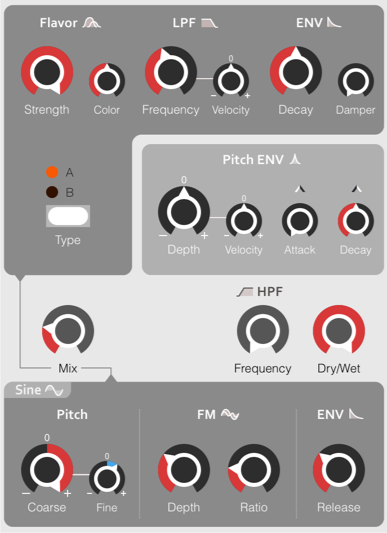
The Resonator section makes pitch and resonance
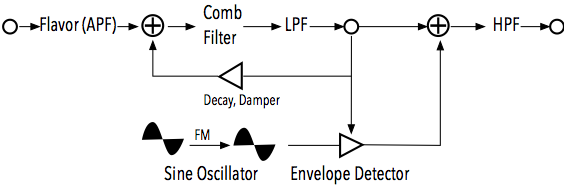
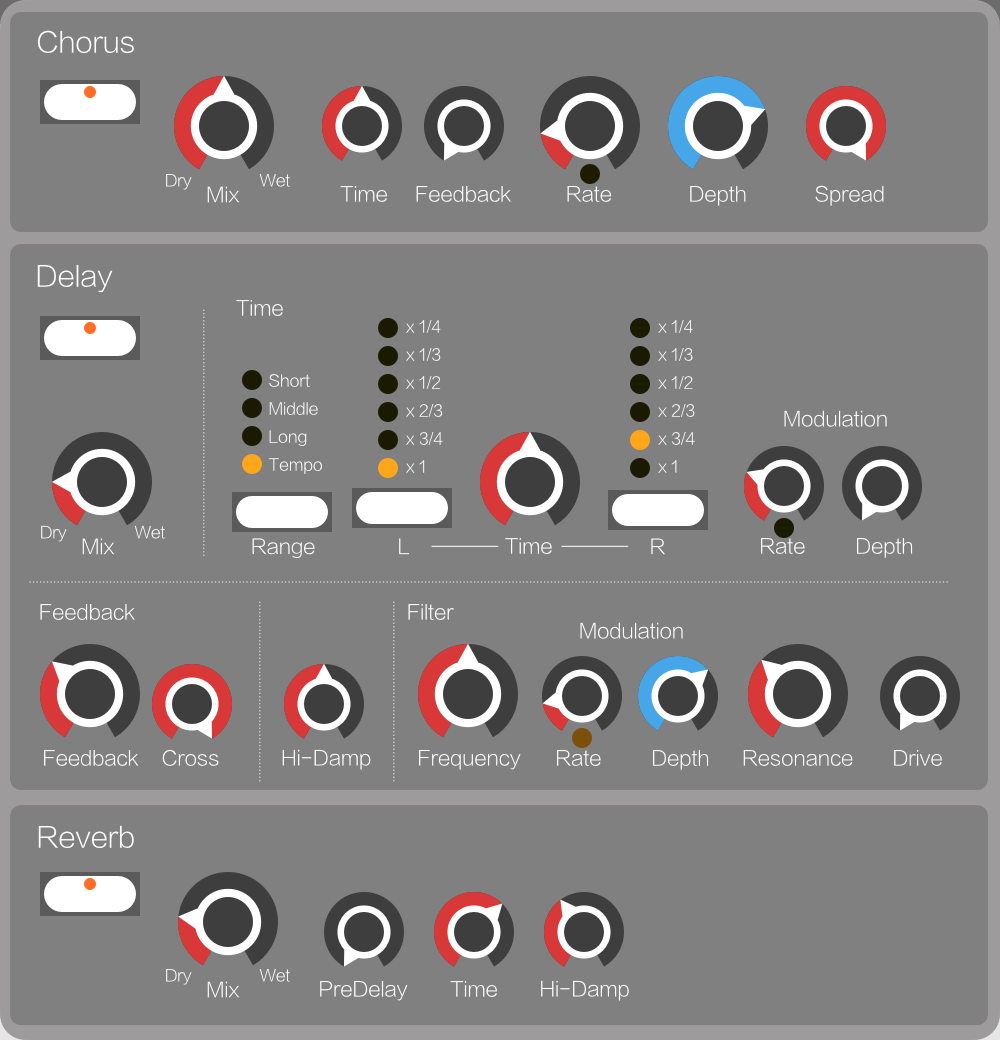
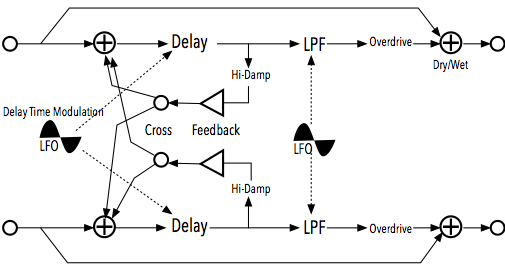
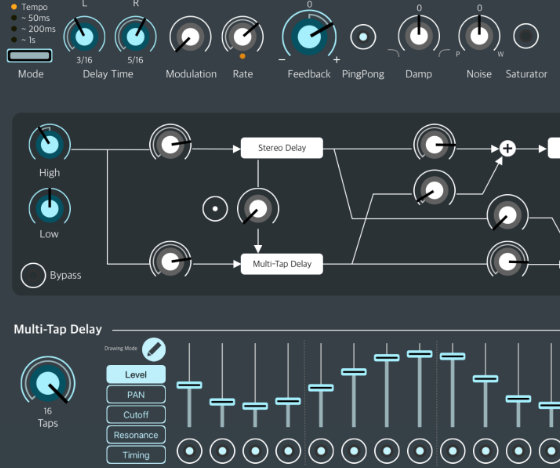
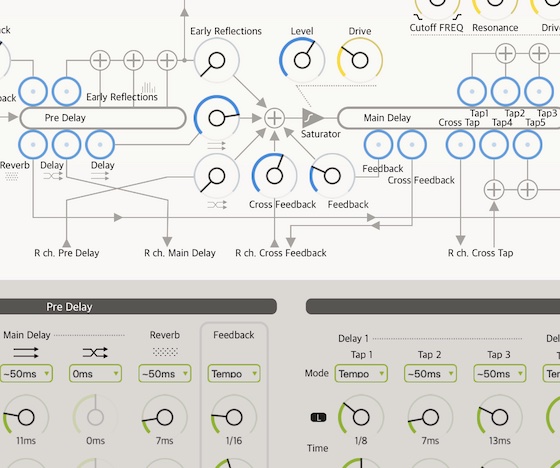
The filter effect is applied to the result of the Delay effect.

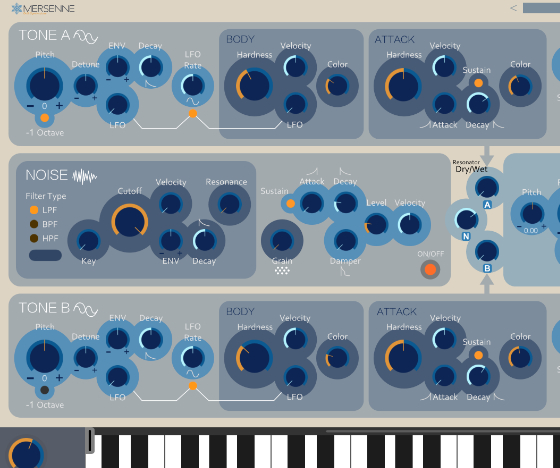
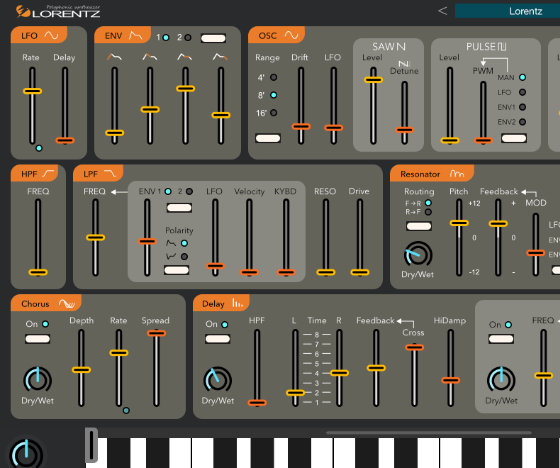
Synthesizer
AUv3
Apple Silicon Mac
iPad
iPhone
1165470423