









Manual
Version 1.3.0
Quick Start
- Launch the app
- First, launch the standalone app (not the AUv3 plug-in).
- When first launched, the product starts in Demo Mode. In Demo Mode, presets cannot be saved, and the plug-in UI is unavailable when the product is loaded in an AUv3 host app.
- On iPad and iPhone, if iCloud Drive is not enabled, a folder picker appears so you can select where to store User Data. If you have no preference, select [On My iPad] or [On My iPhone].
- On Mac, the Local Storage location is set automatically, so a folder picker does not appear even if iCloud Drive is not enabled.
- Start the free trial
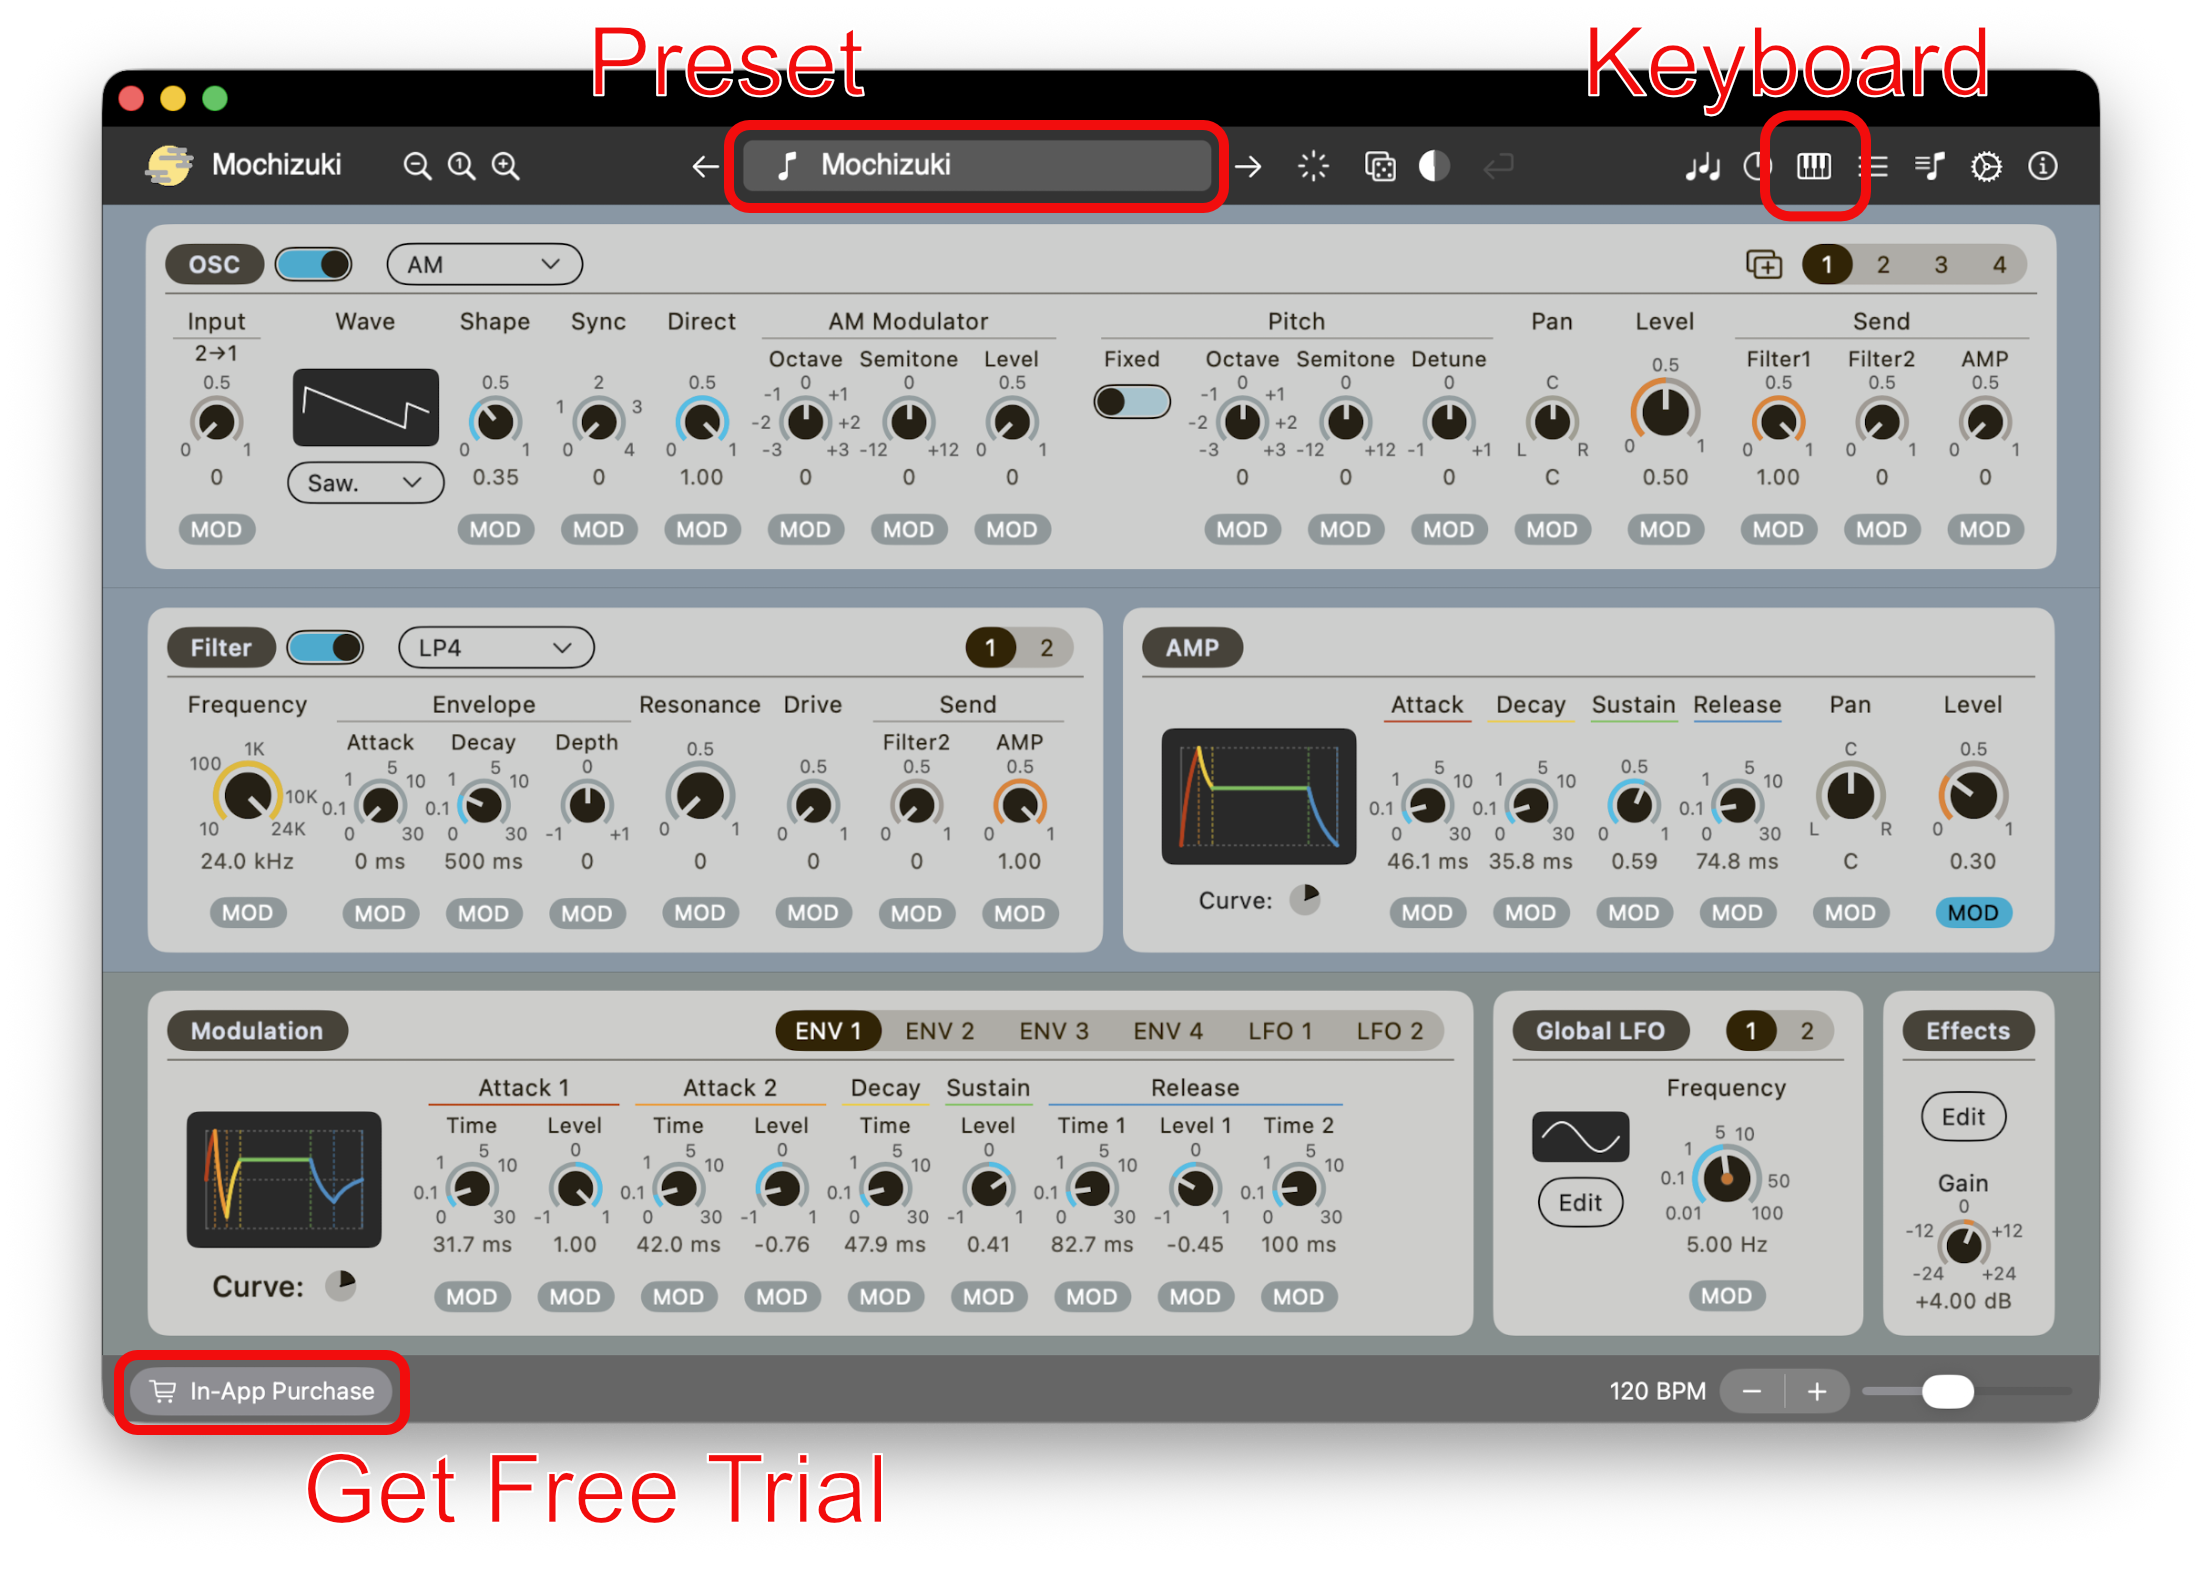
- To use the plug-in in an AUv3 host app or save presets, start the free trial. Open the Store screen from the button at the lower left of the standalone app window, then start the free trial. During the free trial period, you can use the plug-in UI and save presets.
- When the free trial period ends, the product returns to Demo Mode. You will not be charged automatically.
- If the product remains in Demo Mode after starting the free trial, see Troubleshooting, An acquired in-app purchase does not become active.
- Quit the standalone app
- Launch an AUv3 host app and load this product as a plug-in
- Load a preset
- Tap the preset name in the center of the header to open the preset browser.
- Adjust synthesizer parameters
For detailed parameter descriptions, see Synthesizer Parameters.
- Save a preset
Presets can be saved during the free trial period and after purchasing the Core Features.
- Open the preset browser
- Click the [User Folder] button to open [User Folder]
- Click the [Save] button
- Set [Name] and [Icon], then click [Save]
- After the free trial ends
When the free trial period ends, the product returns to Demo Mode. You will not be charged automatically.
In the standalone app, you can continue using the product with the screen keyboard or a MIDI keyboard even after the free trial ends. However, Demo Mode does not allow presets to be saved.
Troubleshooting
An acquired in-app purchase does not become active
Try the following steps.
- First, perform the following according to the situation
- Restart the standalone app or host app
- Restart the device
- Reinstall the app
- Run [Restore Purchases] from the [(i)] button at the right end of the header
The plug-in cannot be found
Try the following steps.
- Restart the host app
- Quit the host app -> launch the standalone app -> quit the standalone app -> restart the host app
- Restart the device
- Reinstall the app
The plug-in does not launch or takes a long time to launch
If you have just enabled iCloud Drive or set up a new device, the plug-in may take longer to launch while iCloud Drive completes its initial sync.
In this case, open Finder (Mac) or the Files app (iPad / iPhone), make sure that iCloud Drive has finished syncing, and then try launching the plug-in again.
A preset does not load correctly or sounds different
Try the following steps.
- Make sure that Parameter Lock is not enabled.
- If the issue persists, try the following:
- Restart the standalone app or host app
- Restart the device
- Reinstall the app
The app does not work correctly
Try the following steps.
- Restart the standalone app or host app
- Restart the device
- Reinstall the app
Restart the device
- Mac : https://support.apple.com/guide/mac-help/mchlp2522/mac
- iPad : https://support.apple.com/HT210631
- iPhone : https://support.apple.com/HT201559
Reinstall the app
- Uninstall (Delete the App from your device.)
- Mac : https://support.apple.com/HT202235
- iPad, iPhone : https://support.apple.com/HT207618
- Redownload from App Store: https://support.apple.com/HT211841
Contact support
Store Screen
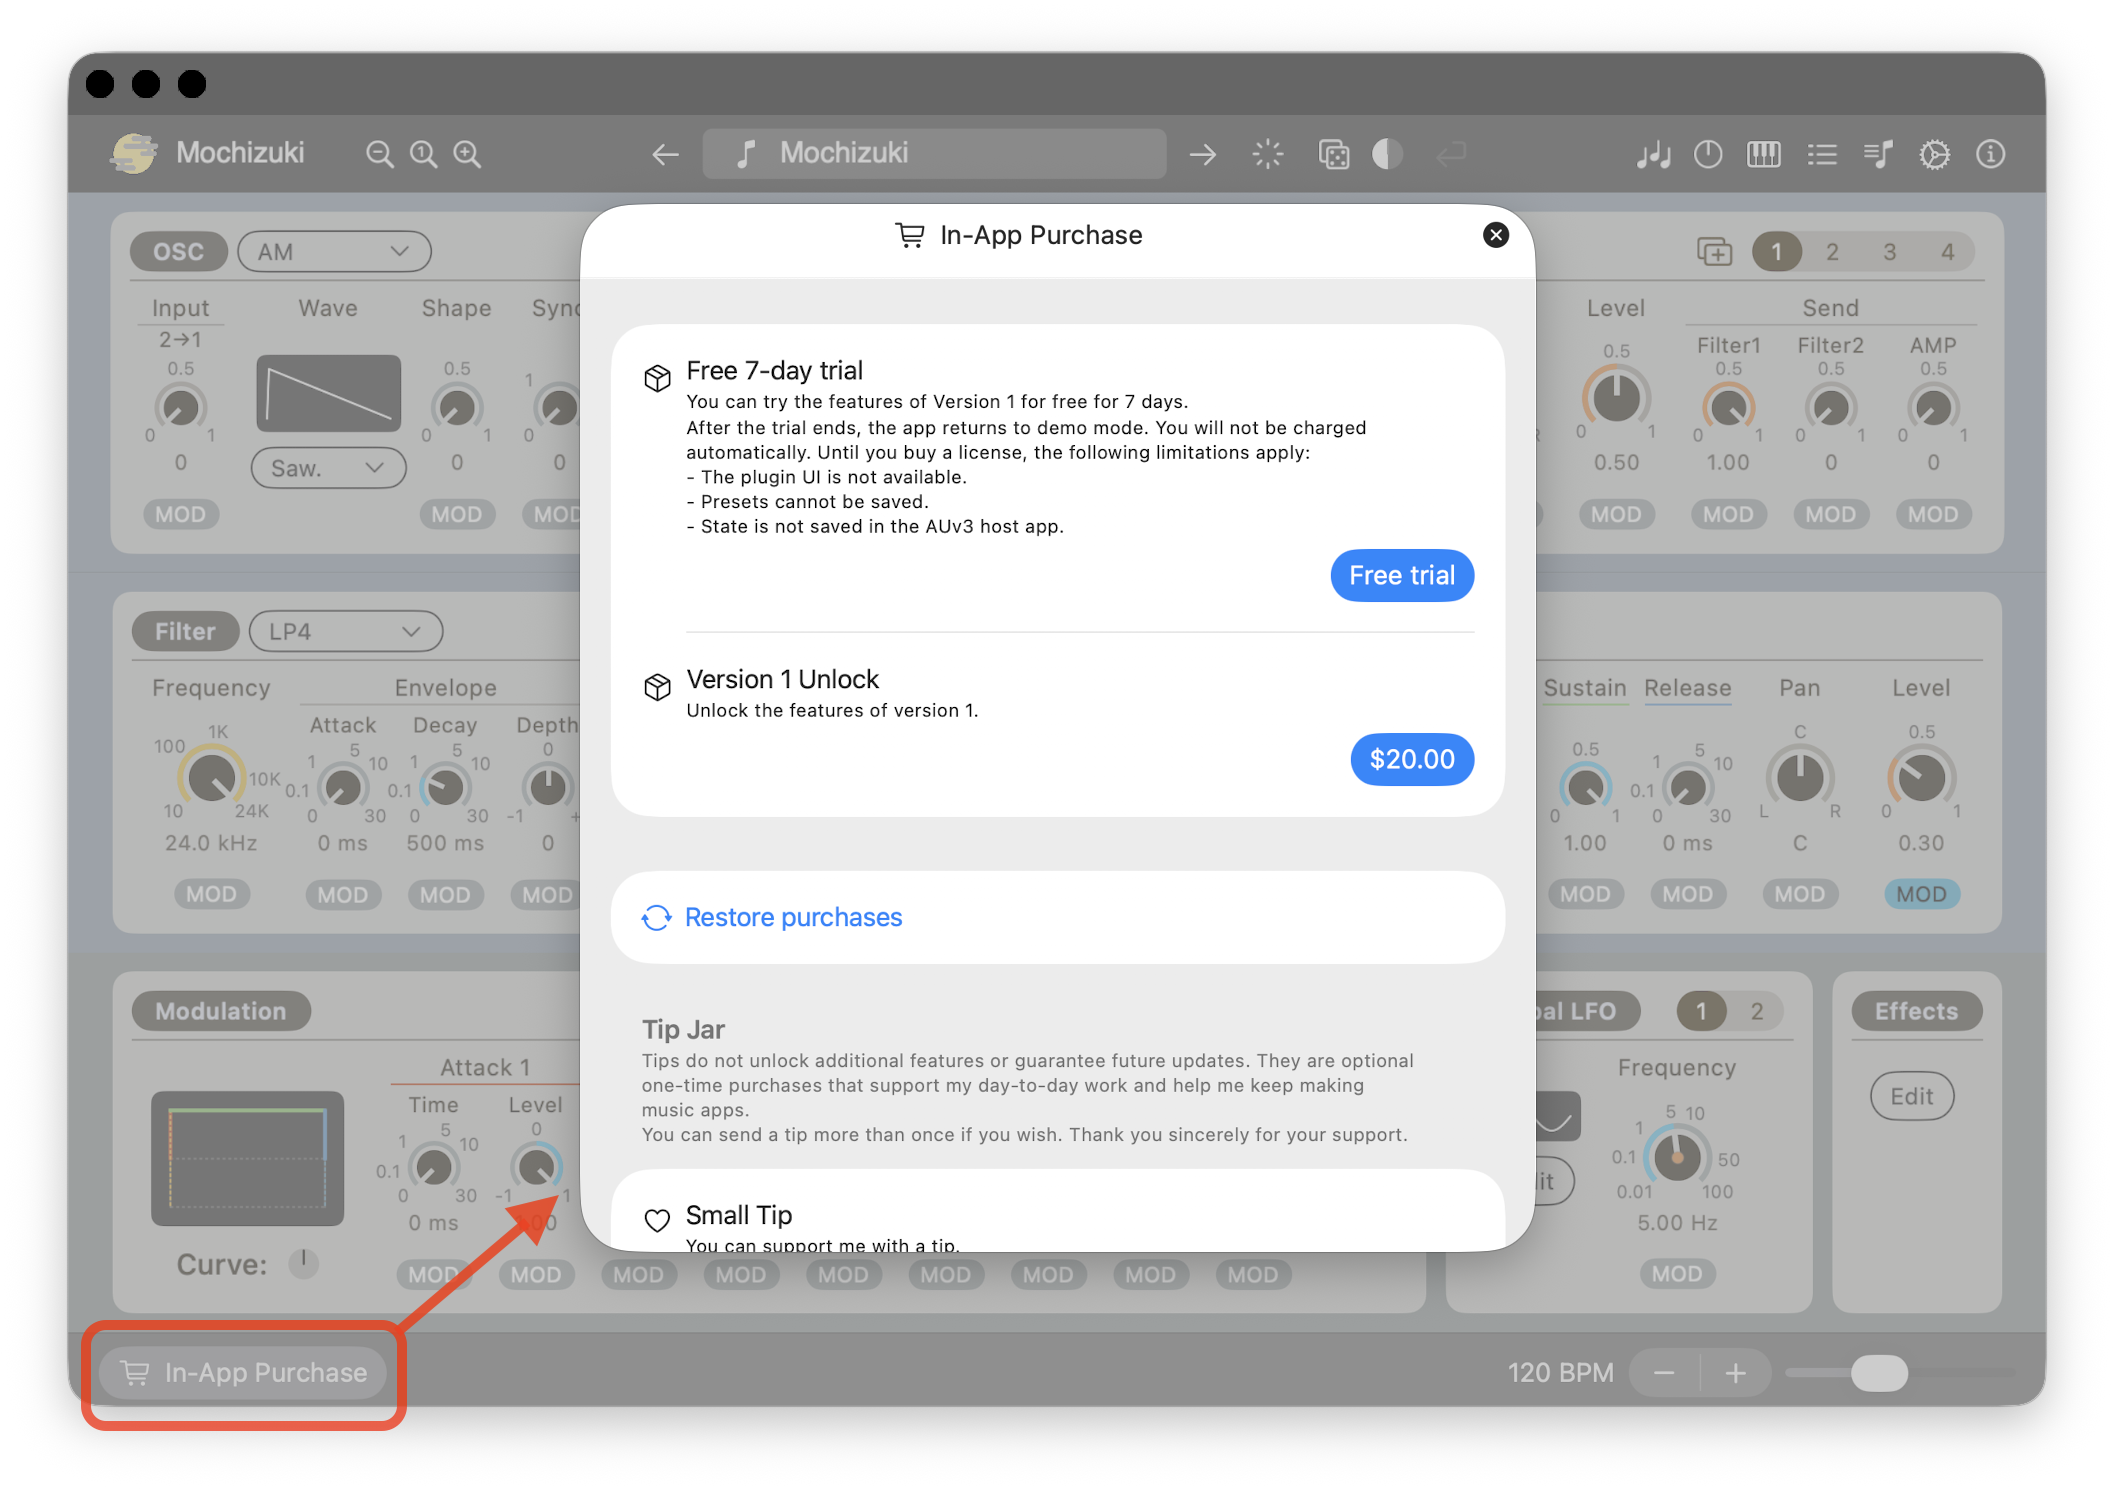
The Store screen can be opened from the button at the lower left of the standalone app window.
Start the Free Trial
Click the [Free Trial] button. The system purchase sheet will be displayed. Follow the on-screen instructions provided by Apple to start your free trial. The [Free Trial] button is shown only if you have not already started the trial. The free trial is available only once.
When the free trial period ends, the product returns to Demo Mode. You will not be charged automatically.
Purchase Core Features
Click the [price] button. The system purchase sheet will be displayed. Follow the on-screen instructions provided by Apple to complete the purchase. The Core Features are unlocked with a one-time purchase. This is not a subscription. Once purchased, Core Features remain unlocked without any additional payment on supported devices running a supported OS version. Optional expansions may be offered separately in the future. No expansions are currently planned or announced.
Restore Purchases
The purchase state is normally updated automatically when the plug-in starts, so you usually do not need to use this button.
Use "Restore Purchases" if Core Features are not unlocked on another supported device, or if the purchase state is not updated correctly.
User Data Storage
User Data Storage settings apply to User Presets, Parameter Lock Sets, and Partial Parameter Data. You can select iCloud Storage or Local Storage in Settings.
iCloud Storage
iCloud Storage uses iCloud Drive to store User Data. To use iCloud Storage, you must enable iCloud Drive on your device. For setup instructions, see Apple Support.
User Data Sync Between Devices
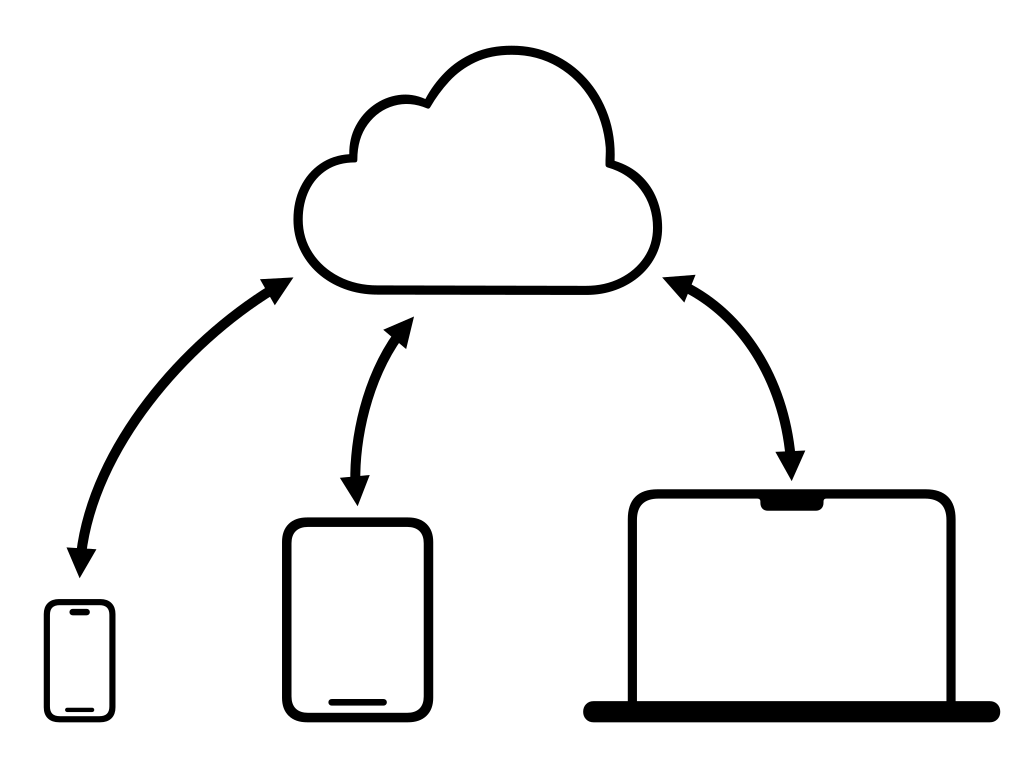
User Data saved in iCloud Storage is automatically synced through iCloud Drive between devices using the same Apple Account. Data that has already been downloaded to the device remains available even when the device is offline. Any changes made while offline are automatically synced when the device reconnects to the Internet.
Loading User Data that exists in iCloud Storage but has not yet been downloaded to the device may take some time. For more reliable operation, use Finder on Mac or the Files app on iPad and iPhone to download the data you need in advance.
Storage Location
User Data is stored in the following folders under the Mochizuki folder. For iCloud Storage, the Mochizuki folder is located in iCloud Drive.
Mochizuki/
    Presets/
    LockSets/
Partials/- Presets: User Presets
- LockSets: Parameter Lock Sets
- Partials: Partial Parameter Data
Local Storage
Local Storage saves User Data on the device.
iPad / iPhone
On iPad and iPhone, you can select the folder used as the Local Storage root.
A Mochizuki folder is created in the selected folder.
Mac
On Mac, the Local Storage root is fixed and cannot be changed.
Local Storage root: ~/Library/Group Containers/group.net.icegear.Mochizuki
Managing User Data
User Data can be managed with Finder on Mac, or the Files app on iPad and iPhone.
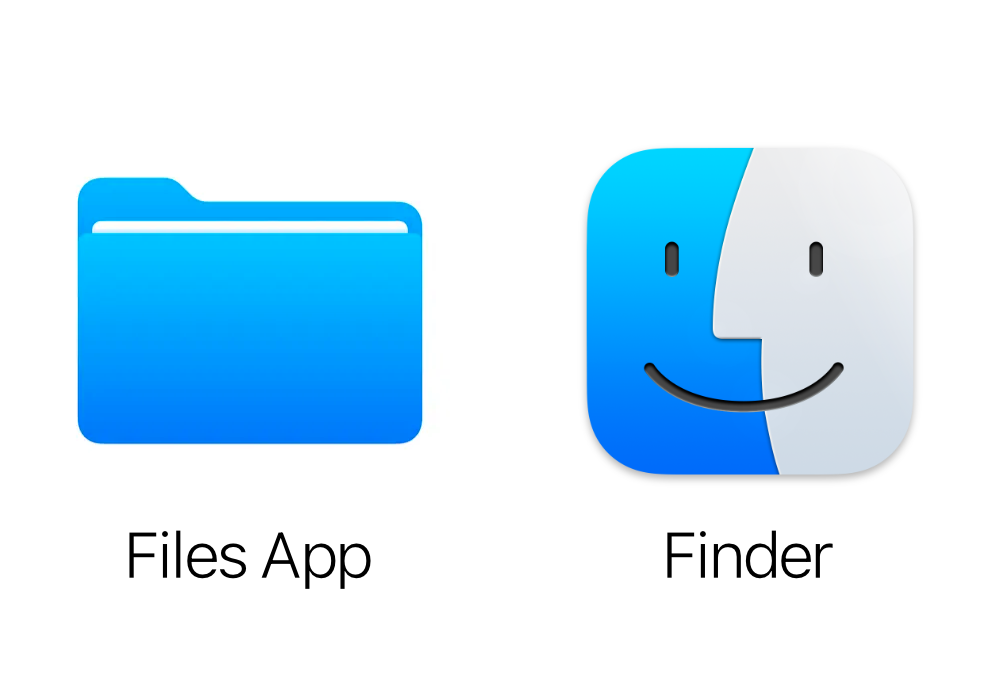
Use these apps to copy, move, delete, back up, restore, export, or import User Data.
You can find instructions for using the OS file management app on Apple Support:
Note: Bookmark and Program Change assignments are managed separately from preset files.
Bookmark and Program Change number assignments are managed separately from preset files. Therefore, if you rename or move preset files or folders with an external file management app, their Bookmark and Program Change assignments may be lost. If you need to keep bookmarks or Program Change numbers, use the browser function built into this product to move or rename presets.
For the same reason, Bookmark and Program Change number assignments are not included when performing Backup and Restore or Export and Import by copying files with the OS file management app. Restoring or importing preset files does not restore Bookmark or Program Change number assignments. If they are lost, they must be assigned again manually.
Compressed Files
Mochizuki cannot open compressed files directly. Decompress files such as [.zip] files with Finder or the Files app before using them.
Backup and Restore
You can back up or restore User Data by copying files or folders with Finder or the Files app.
Export and Import
You can export or import User Data by copying files with Finder or the Files app. Copy imported files into the appropriate folder in the User Data Storage currently in use.
Dial and Slider Operation
- Vertical drag: Coarse adjustment
- Horizontal drag: Fine adjustment
- Double-click: Return to the default value
Main Screen
Header

Zooming the Screen
- Zoom Out: Display the screen smaller
- Actual Size: Return the screen to actual size
- Zoom In: Display the screen larger
Preset

Arpeggiator

Macro

Keyboard

Other Parameter Settings

Parameter List

Parameter Lock

Settings

Info

- About: Show or hide the About screen
- Open Product Page: Open the product website
- Open Manual Page The manual is provided as a web page
- Support
- Support Page Open the support website
- Write Email to Support: Send an email to support
- Store: Open the standalone app to make a purchase
- Restore Purchases
- Use this if the purchase state is not reflected
Main Area
Footer (standalone app only)

- Store: Open the Store Screen
- Tempo setting: When used as a plug-in, the tempo follows the host app
Presets
Preset Browser

Click the [preset name] area in the main window toolbar to show the preset browser.

Factory Preset Folder

Contains factory presets built into the product. User presets cannot be saved in the factory preset folder.
User Preset Folder

This is where presets created by the user are saved.
User Preset Folder Toolbar

- Save: Save a preset
- Create New Folder: Create a folder for user presets at the current location
- Recall: Return to the state before loading the preset
- Sort: Change the sort order of the preset list
- Selection Mode: Select multiple items and move or delete them together
Bookmark

Shows presets with the specified bookmark. To add a bookmark to a preset, use the preset context menu.
Program Change

This is the list of presets loaded in response to Program Change MIDI messages. To assign a program number to a preset, use the preset context menu.
Icon Search

Shows presets with the specified icon.
Text Search

Shows presets that contain the entered text.
Refresh

Common Buttons
- Recall: Return to the state before loading the preset
- Sort: Change the sort order of the preset list
- Name: Sort by name
- Icon: Sort by icon
- Bookmark: Sort by bookmark
- Program: Sort by Program Change number
- Date: Sort by date
Preset Context Menu
Right-click a preset, or long-press it on iPad, to show a menu of operations available for that preset.
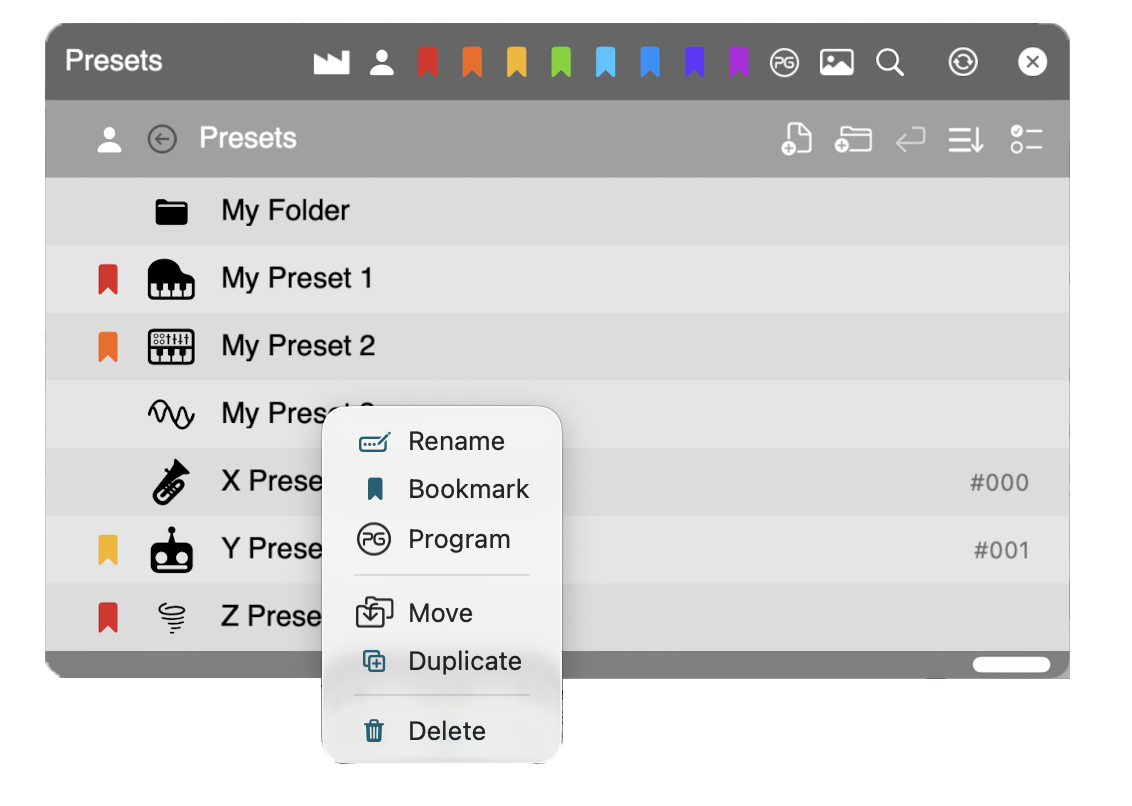
- Rename (User presets only)
- Bookmark: Add a bookmark
- Program: Assign a Program Change number
- Move (User presets only): Move the preset to another folder
- Duplicate (User presets only): Duplicate the preset
- Delete (User presets only): Delete the preset
Initialize

The main window toolbar has a rays icon  . Click it to initialize all parameters.
Randomize
Note: Randomization may produce extremely loud sound or no sound at all. Use caution.

The main window toolbar has a [dice] icon and a randomization amount dial. Click the [dice] icon to randomize parameters. The randomization amount can be adjusted with the dial to the right of the [dice] button.
Randomization Amount Per Parameter
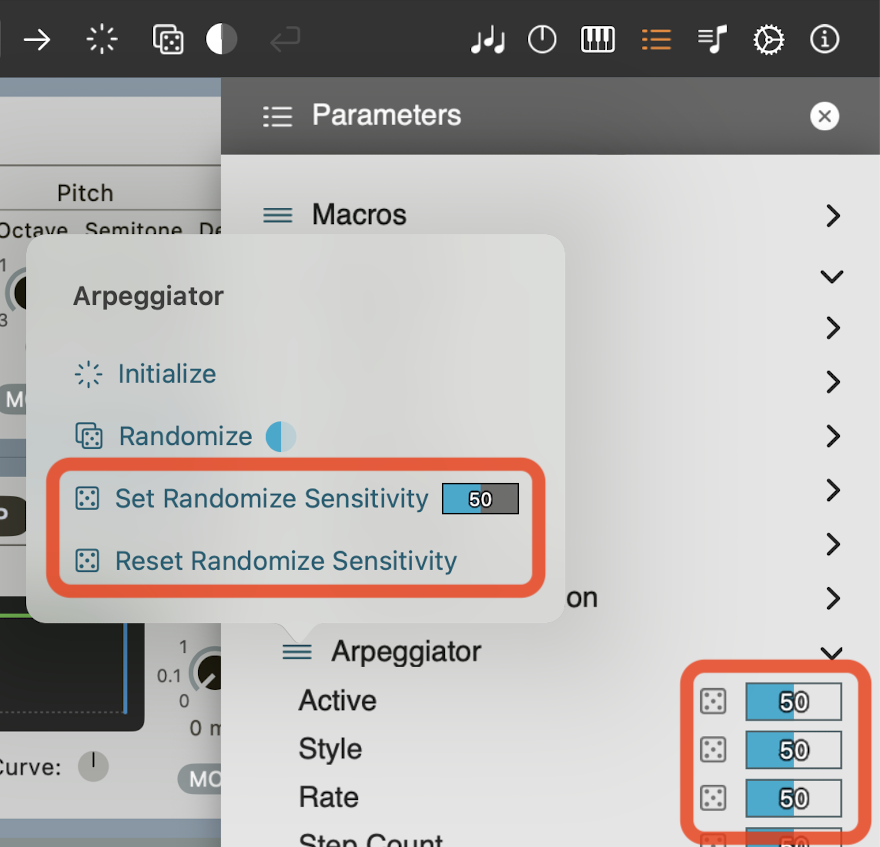
You can adjust the randomization amount for each parameter in the Parameter List.
A value of 0 disables randomization for that parameter, while higher values increase the amount of variation applied during randomization.
Recall
 The Recall button returns the parameters to the state before the most recent bulk operation, such as preset initialization, randomization, or OSC copy. Note that Recall is not an Undo function.
Only the immediately preceding bulk operation can be recalled. If you manually change a parameter such as a knob or switch after a bulk operation, Recall is no longer available. Saving a preset also clears the recall state.
Popup Window Toolbar
The Arpeggiator, Macro, Modulation, and MOD Shaper popup window toolbars have a rays icon . Click it to initialize the parameters in that popup window.
The Arpeggiator and Macro popup window toolbars have a [dice] icon and a randomization amount dial. Click the [dice] icon to randomize the parameters in that popup window. The randomization amount can be adjusted with the dial to the right of the [dice] button.
Arpeggiator
Note: Per-Note Expression cannot be used while the arpeggiator is active.

- Active: On/Off
- Style: Algorithm / Program
Algorithm Mode
This mode builds arpeggio patterns by selecting algorithms such as ascending or descending patterns. Based on the notes being held and the Pattern setting, the note to be played is determined automatically. This mode is suitable for quickly creating common up, down, and up-down arpeggios.
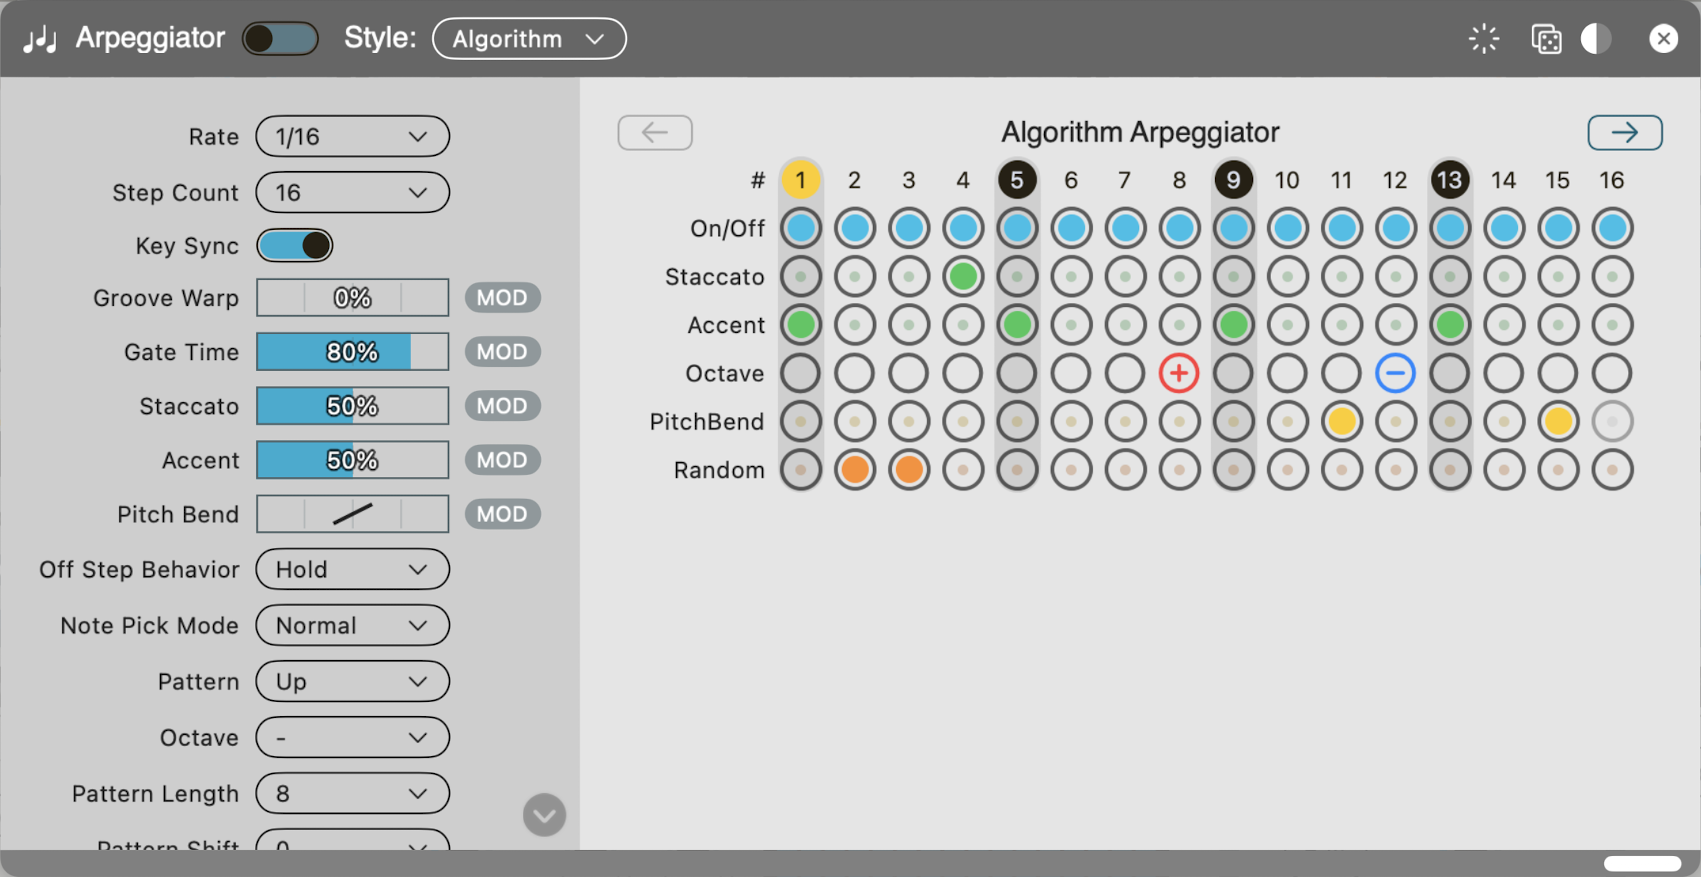
Parameters
- Rate: Sets the time unit for each step. The arpeggio speed is determined by a tempo-synced note length
- Step Count: Sets the number of steps. Step settings repeat within this range
- Key Sync: Sets whether the playback step position returns to the beginning when a new key press starts
- Groove Warp: Moves the playback position of even-numbered steps forward or backward to add swing
- Gate Time: Sets the gate time for each step. Smaller values create shorter notes, while larger values extend notes toward the next step
- Staccato: Higher values shorten the gate time of Staccato steps
- Accent: Higher values increase the On velocity of Accent steps
- Pitch Bend: Sets the pitch bend curve
- Off Step Behavior:
- Hold: Sustain the most recent On step
- Rest: Rest
- Note Pick Mode: Selects how notes are picked
- Normal: Advance to the next note to pick on every step, regardless of whether the step is On or Off
- Skip Off Step: Do not advance to the next note to pick on Off steps
- Pattern:
- Up:

- Down:

- Up-Down:

- Up+Down:

- Down-Up:

- Down+Up:

- Zigzag Up:

- Zigzag Down:

- Up:
- Octave: Adds notes above the held pitches by the specified number of octaves to the arpeggio note set
- Length: Sets the length of the note selection pattern
- Pattern Shift: Sets the start position of the note selection pattern
Step Editor
- On/Off: Step On/Off
- Staccato: Shortens the gate time of On steps
- Accent: Increases the OnVelocity of On steps
- Octave: -: 1 octave down, +: 1 octave up
- Pitch Bend: Bend pitch toward the next On step
- Random: Ignore the pattern and randomly choose the sounding note from the held notes
Monophonic Program Mode
This mode builds arpeggio patterns by specifying, for each step, which held note should sound and when. Because each step can directly specify "which numbered held note to play," this mode is useful for patterns that select specific notes from a chord and move like a melody.
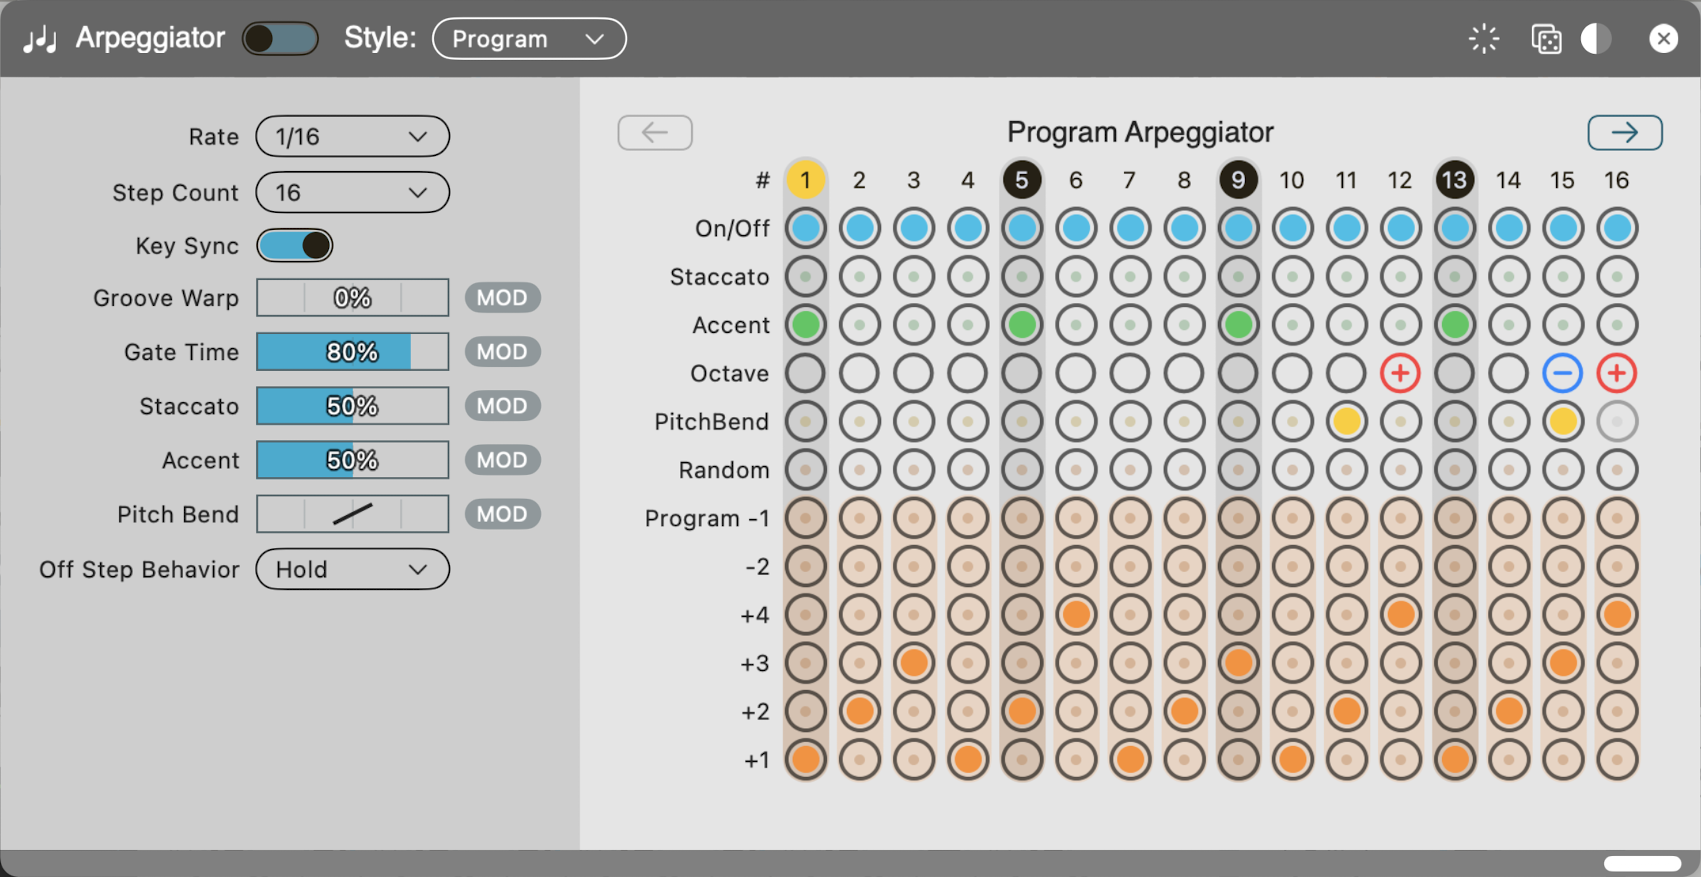
Parameters
Rate, Step Count, Key Sync, Groove Warp, Gate Time, Staccato, Accent, Pitch Bend, and Off Step Behavior are the same as in Algorithm Mode.
Step Editor
- On/Off: Step On/Off
- Staccato: Shortens the gate time of On steps
- Accent: Increases the OnVelocity of On steps
- Octave: -: 1 octave down, +: 1 octave up
- Pitch Bend: Bend pitch toward the next On step
- Random: Ignore the pattern and randomly choose the sounding note from the held notes
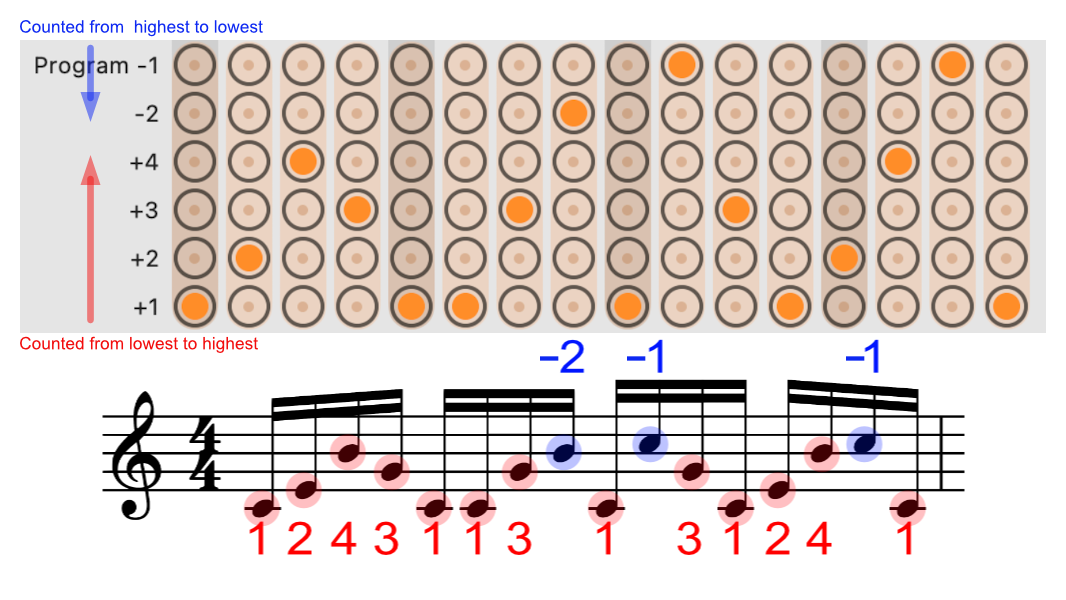
- Program: Selects one held note to play. Positive numbers specify the position counted from the lowest held note, and negative numbers specify the position counted from the highest held note.
Program numbers can be counted from either the lowest or highest held note. Counting from the highest note is useful when playing a chord with the left hand while adding melody notes with the right hand.
If seven or more notes are held, notes other than the bottom four and top two cannot be included in the arpeggio.
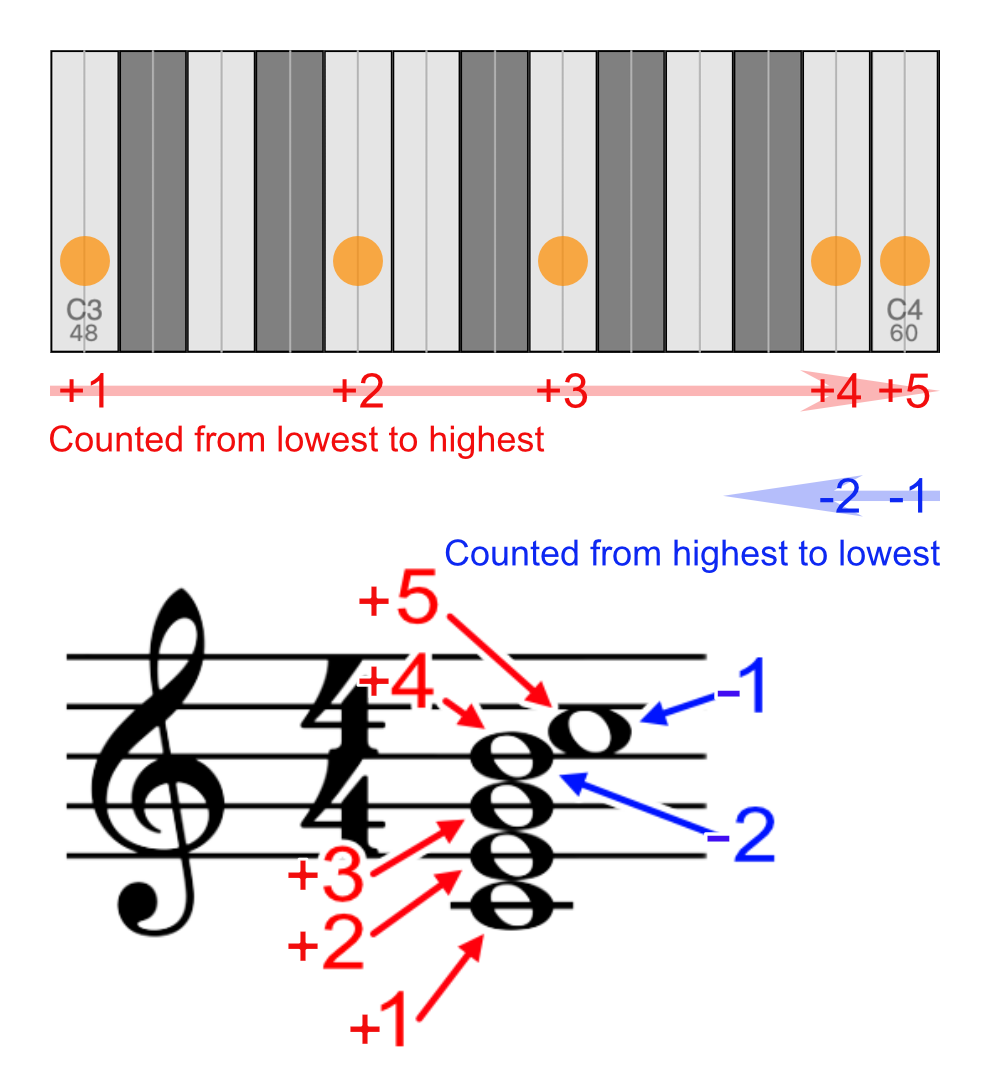
If the C3, E3, G3, B3, and C4 keys are pressed at the same time, C3 is the first note, E3 is the second, G3 is the third, B3 is the fourth, and C4 is the fifth.
Polyphonic Program Mode
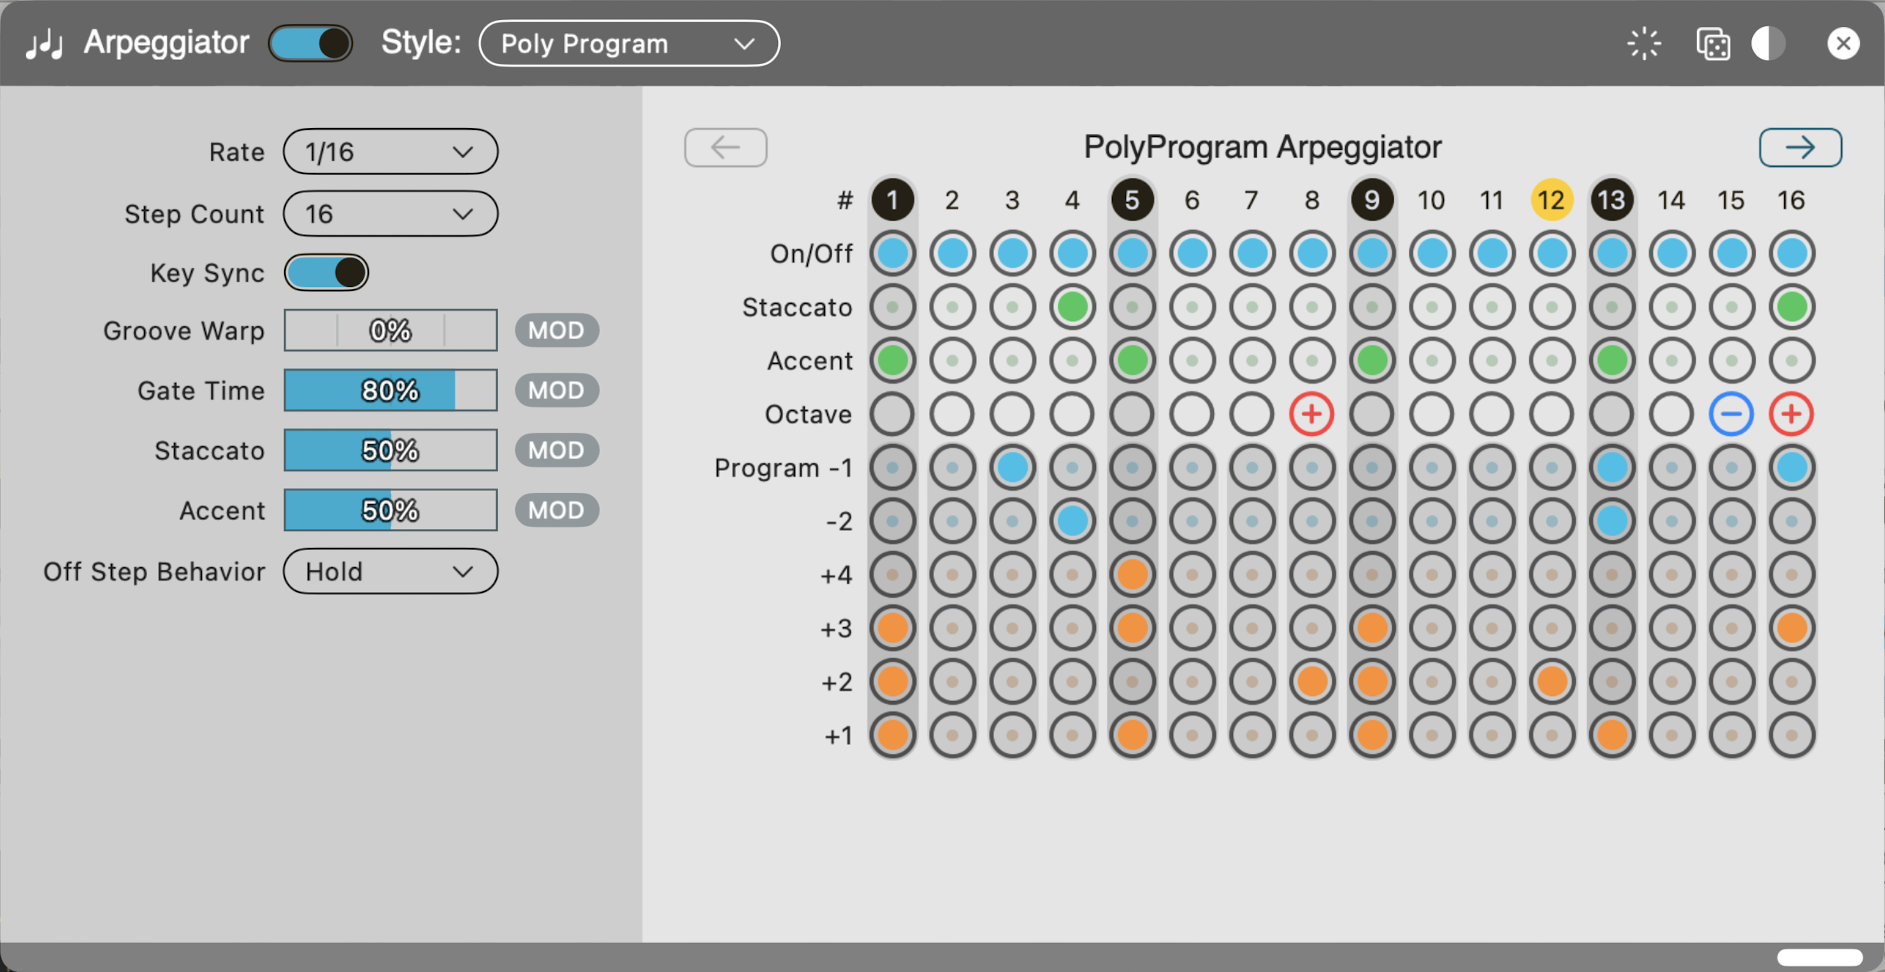
This mode builds polyphonic arpeggio patterns by selecting, for each step, one or more notes from the held notes. Unlike Monophonic Program Mode, it can play multiple selected notes simultaneously, making it useful for rhythmic chord patterns and sequences with changing voicings.
Parameters
Rate, Step Count, Key Sync, Groove Warp, Gate Time, Staccato, Accent, and Off Step Behavior are the same as in Algorithm Mode.
Step Editor
- On/Off: Step On/Off
- Staccato: Shortens the gate time of On steps
- Accent: Increases the OnVelocity of On steps
- Octave: -: 1 octave down, +: 1 octave up
- Program: Selects the held notes to play. Multiple notes can be selected for each step. Positive numbers specify positions counted from the lowest held note, and negative numbers specify positions counted from the highest held note.
Program can select the bottom four and top two held notes. If seven or more notes are held, notes between these ranges cannot be selected.
Macro
Macros are general-purpose controls that can be controlled by MIDI CC sent to the master channel, or by an AU host. Assign them to parameter [MOD] slots to control the sound.
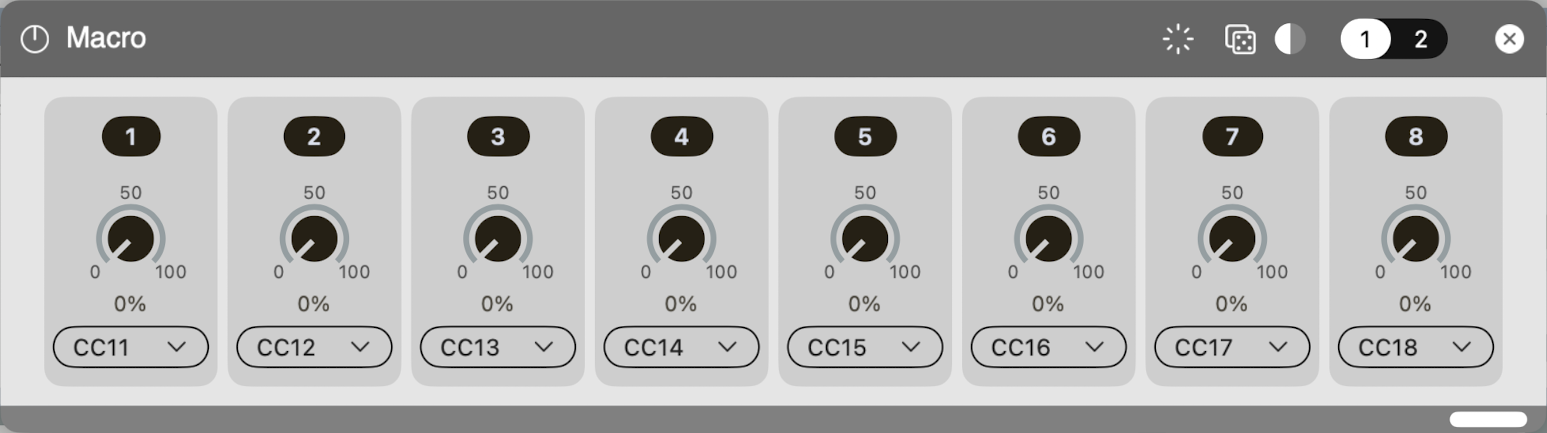
- Value: Current Macro value.
- CC#: MIDI CC number assigned to the Macro. MIDI CC messages received on the master channel update the Macro value.
Macros can be used as a way to control parameters from the host that are not exposed directly to the AU host. -> How to control parameters from an AU host by combining Macro and Modulation
Keyboard

Performance Controls:

Shows or hides the pitch bend and modulation wheels. Use these when auditioning with the screen keyboard in the standalone app or when no external MIDI controller is connected. The pitch bend range is changed in Other Parameter Settings.
Changing Keyboard Position and Size
- Octave Down: Move the keyboard display range down by 1 octave
- Transpose Down: Move the keyboard display range down by 1 semitone
- Keyboard Zoom In: Increase the displayed keyboard size
- Keyboard Zoom Out: Decrease the displayed keyboard size
- Transpose Up: Move the keyboard display range up by 1 semitone
- Octave Up: Move the keyboard display range up by 1 octave
Pitch Bend Quantization
Quantizes per-note pitch bend from the screen keyboard. External MIDI input is not affected.

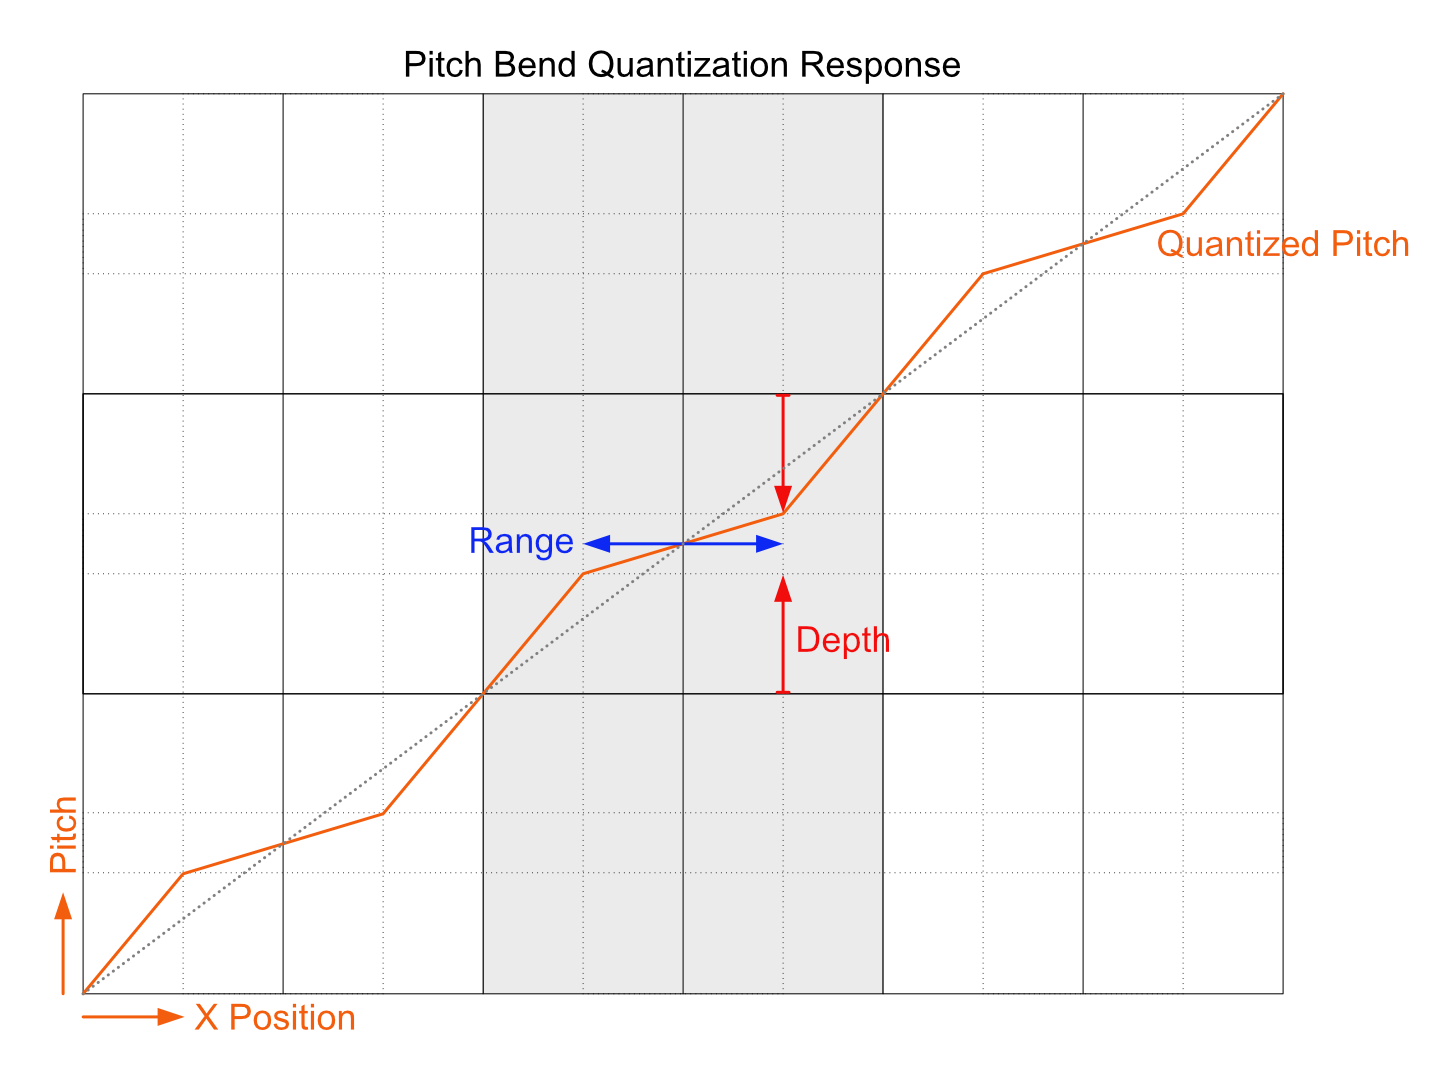
- Range: Range to quantize
- Depth: Quantization depth
- Chromatic: Chromatic quantization mode switch
- Off: Quantize according to the Range/Depth settings
- On: Fully quantize in semitone units
Velocity
Sets velocity values for the screen keyboard. External MIDI input is not affected.
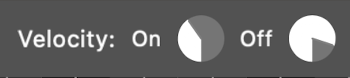
- ON Velocity: Velocity value when pressing the screen keyboard
- OFF Velocity: Velocity value when releasing the screen keyboard
Hold
Puts the screen keyboard into Hold mode. External MIDI input is not affected.
Toggles Hold mode for the screen keyboard. Hold applies only to the screen keyboard; MIDI input notes are not affected.
Keyboard Settings:

- Y-Axis: Selects whether Slide or Pressure information is output when dragging the screen keyboard vertically. If Slide or Pressure is assigned as a modulation source in the sound, the selected information is reflected as performance expression.
Keyboard Size

Enlarges the keyboard vertically, making it easier to select pitches by touch and providing a wider Y-Axis range.
Other Parameter Settings
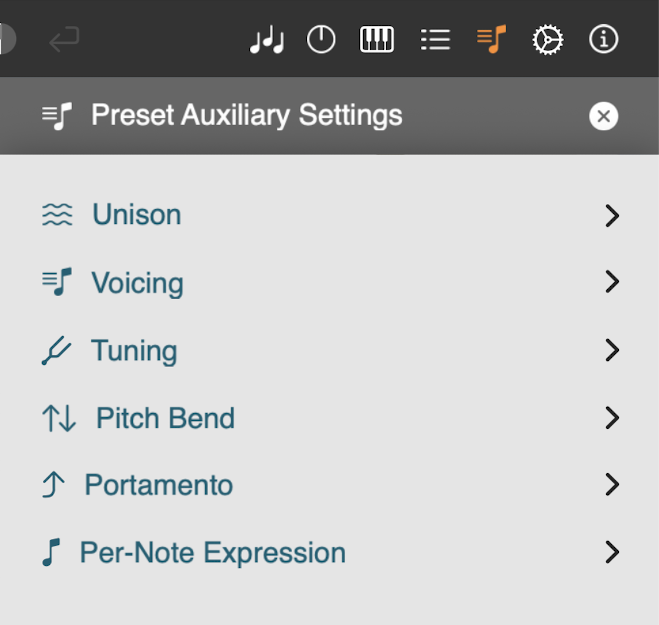
These are additional parameters that are not shown in the main area.
Parameters here are saved in presets.
Master Volume

- Master Volume: Set the final master volume.
Unison
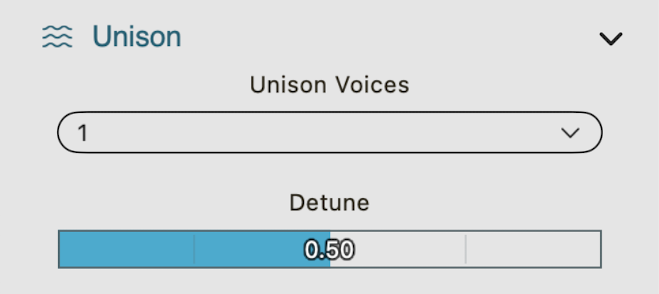
- Unison Voices: Sets the number of voices that make up one note. Setting this to 2 or higher greatly increases CPU usage, so use caution.
- Detune: Sets the pitch offset between unison voices.
Voicing
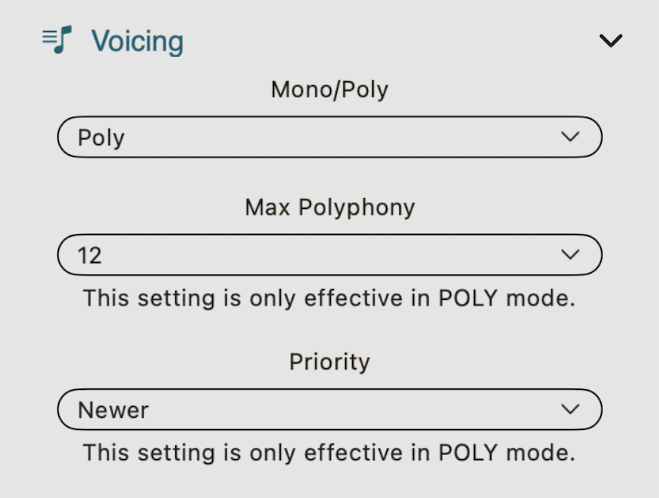
Voicing sets how notes are played. In Poly mode, multiple notes can be played at the same time. In Mono modes, only one note can sound at a time. Envelope retrigger behavior differs between modes when a new note is played while another key is held.
Mono/Poly:
Mode Behavior Poly Multiple notes can sound at the same time. Each note's Envelope starts from the beginning independently. Max Polyphony sets the maximum number of simultaneous notes. Mono Legato Only one note sounds. If the previous key is held while the next key is played, the Envelope is not retriggered; only the pitch changes while the current state is maintained. Mono Multi Trigger Only one note sounds. If the previous key is held while the next key is played, the Envelope starts its Attack from the current output level. Mono Retrigger Only one note sounds. Even if the previous key is held while the next key is played, the Envelope starts its Attack from zero level. Max Polyphony: Maximum number of simultaneous notes (Poly mode only)
Priority: Note priority when the maximum number of simultaneous notes is exceeded (Poly mode only)
- Newer: Newer notes have priority
- Stronger: Notes with higher Velocity have priority
- Lower: Lower note numbers have priority
- Higher: Higher note numbers have priority
Tuning
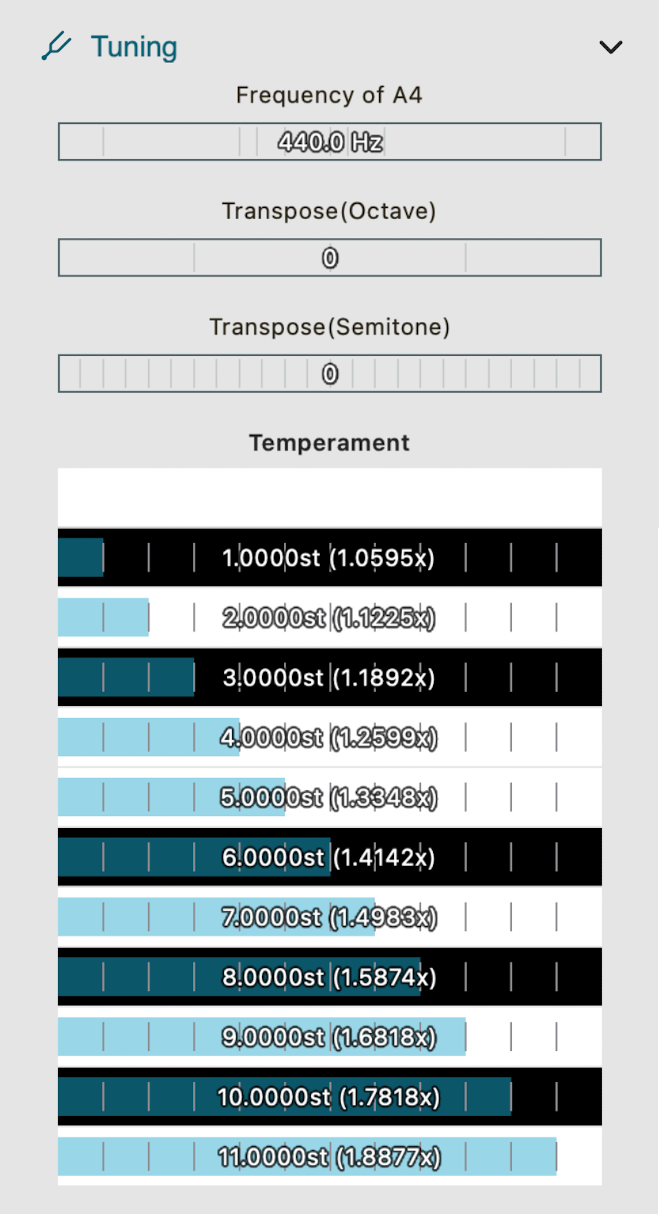
- Frequency of A4: Sets the reference frequency for A4. Use this to match tunings other than the standard 440 Hz
- Transpose(Octave): Octave transposition
- Transpose(Semitone): Semitone transposition
Temperament
Sets a temperament that repeats every octave. Each note in the octave can be tuned in cents relative to C. Use this for temperaments other than equal temperament, or when you want to slightly raise or lower specific notes. The temperament set here is applied together with normal pitch settings and transposition.
Pitch Bend
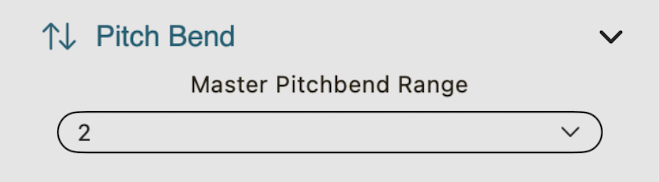
- Master Pitch Bend Range: Sets the maximum pitch bend amount used for the master channel and normal MIDI pitch bend. Per-note pitch bend amount for the screen keyboard is set with Pitch Bend Range (X) in Per-Note Expressions.
Portamento
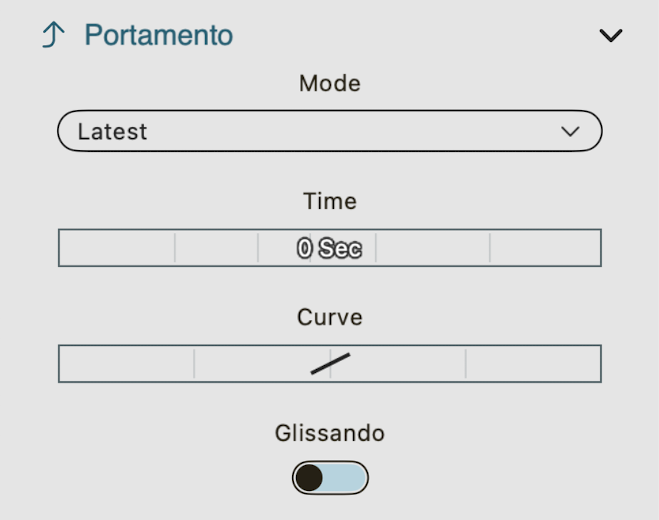
Portamento continuously moves the pitch from the previous note to the next and is particularly useful with Mono voicing modes.
- Mode
- Latest: Portamento starts from the most recently pressed note
- Nearest: Portamento starts from the note with the nearest pitch
- Time: Portamento time
- Curve: Curve for how pitch changes
- Glissando: Glide in semitone steps instead of changing pitch smoothly
Per-Note Expressions
Sets per-note pitch bend, slide, and pressure.
Note
- This product is not MPE-compatible.
- Per-Note Expression cannot be used while the arpeggiator is active.
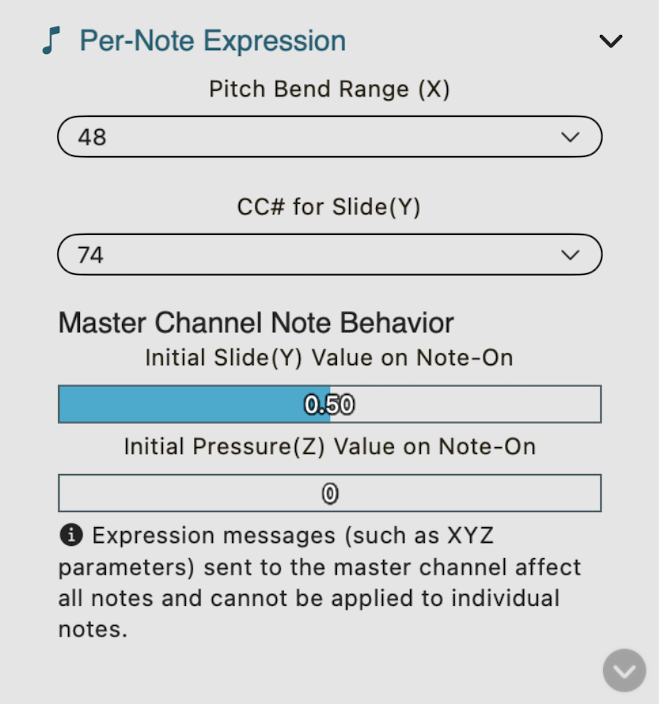
- Pitch Bend Range (X): Maximum pitch bend amount
- CC# for Slide (Y): MIDI CC number used for Slide
- Master channel note behavior: Notes received on the master channel do not have per-note Slide or Pressure values. This sets the Slide and Pressure values used for notes received on the master channel.
Parameter List
The Parameter List lets you initialize or randomize specific parts of the sound, and save or load Partial Parameter Data.
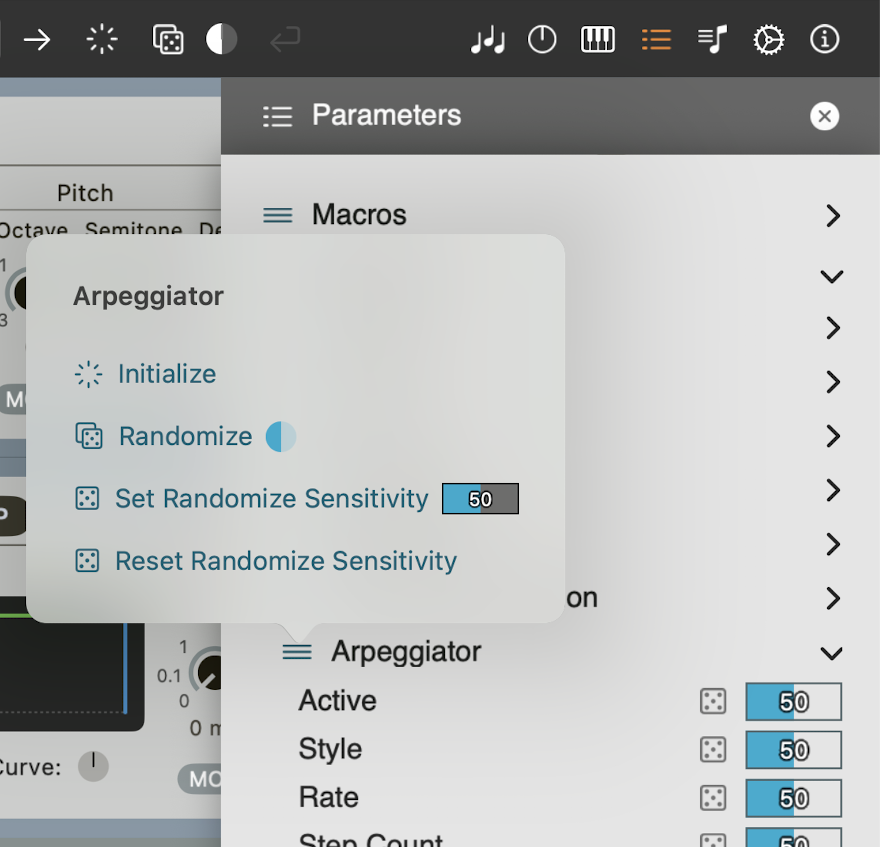
Menu Button
The contents of the displayed menu vary depending on the parameter and parameter group.
- Initialize: Initialize the parameters under the group
- Randomize
- Randomize: Randomize the parameters under the group. Use the dial on the right to specify the randomization amount
- Set Randomize Sensitivity: Set the randomization sensitivity for the parameters under the group all at once. 0 disables randomization, while 100 applies the maximum amount.
- Reset Randomize Sensitivity: Return the randomization sensitivity of the parameters under the group to the initial value
- Partial Parameter Save:
Use the menu for a group or parameter to save the parameters contained in that part of the Parameter List. Partial Parameter Data is saved as a [.mochizuki.partial] file in the Partials folder of the currently selected User Data Storage.
- Save All Children: Save parameter values, Randomize Sensitivity, and Modulation Bank settings contained in the selected item.
- Save Parameters Only: Save only the regular parameter values. Randomize Sensitivity and Modulation Bank settings are not saved.
- Save Randomize Sensitivity Only: Save only Randomize Sensitivity.
- Save Modulation Bank Only: Save only Modulation Bank settings.
Partial Parameter Load
Use the [Load] button at the top of the Parameter List to load Partial Parameter Data. Only the parameters stored in the file are applied to the current sound; parameters not included in the file remain unchanged.
This lets you combine part of a sound, such as an OSC, Filter, or Effect, with the current sound. Parameters protected by Parameter Lock are not changed by Partial Parameter Load.
Parameter Lock
Parameter Lock protects selected parameters from changes made by Preset Load, Randomize, Initialize, and Partial Parameter Load. For example, you can load another preset while keeping the current Filter settings, or randomize a sound while keeping selected parameters fixed.
Lock settings are not stored in presets.
Locking Parameters
In Parameter Lock View, turn on the checkbox for an item to lock it. Locking a group also protects the parameters contained in that group.
Items that inherit a lock from a higher-level group display a curved arrow and lock icon, and their names are shown semi-transparently. An orange mark on a higher-level item indicates that one or more items below it are individually locked.
Group Operations
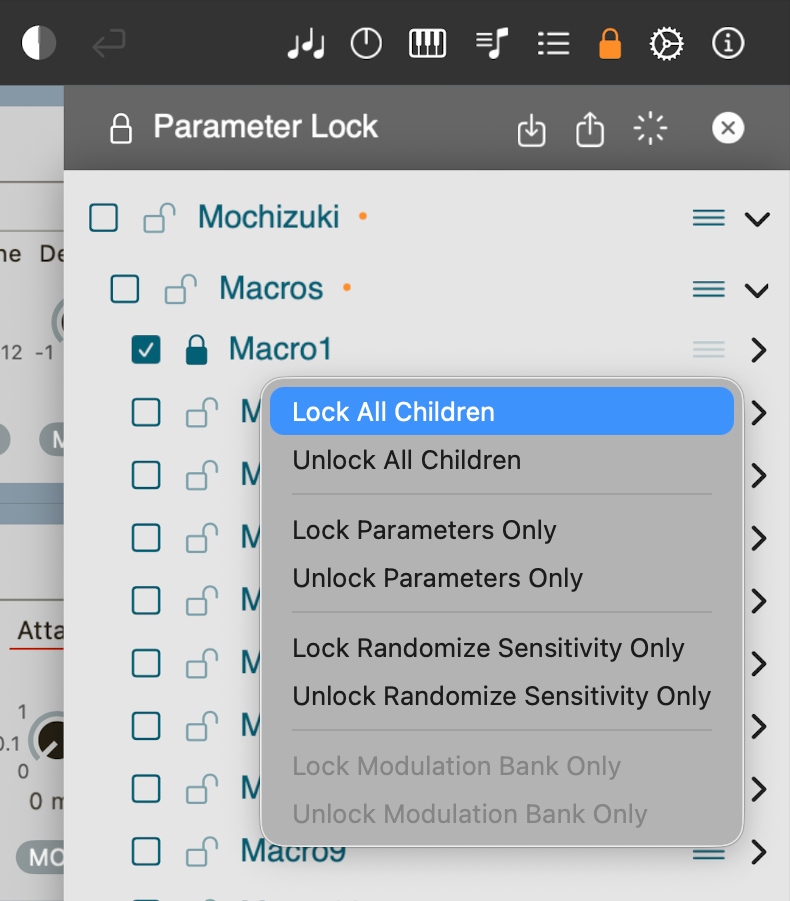
Use an item's menu to lock or unlock its children:
- Lock / Unlock All Children
- Lock / Unlock Parameters Only
- Lock / Unlock Randomize Sensitivity Only
- Lock / Unlock Modulation Bank Only
For example, you can protect only regular parameter values while allowing Randomize Sensitivity and Modulation Bank settings to change.
Operations Affected by Parameter Lock
Parameter Lock prevents changes made by the following operations:
- Preset Load
- Randomize
- Initialize
- Partial Parameter Load
Locked parameters can still be changed normally with direct UI operations such as knobs and sliders.
Settings
Parameters here are not saved in presets.
- Appearance
- Select Light Mode or Dark Mode
- User Data Storage
- Select iCloud Storage or Local Storage as the storage method for User Presets, Parameter Lock Sets, and Partial Parameter Data.
- On iPad and iPhone, [Select Folder] appears when Local Storage is selected, allowing you to select or change the storage location.
- On Mac, [Select Folder] does not appear because the Local Storage location is fixed.
- Changes to User Data Storage take effect after restarting the app.
- For details about storage methods and locations, see User Data Storage.
- Master Channel
- Sets the MIDI channel for monophonic modulation that affects the overall sound rather than individual notes
- Pitch Bend, Pressure, and CC messages sent to the Master Channel are treated as monophonic modulation affecting all notes.
- The Master Channel setting must match the host’s master channel setting. Only channels 1 and 16 can be selected.
- Minimum Modulation Refresh Rate
- Sets the minimum rate at which modulation values are updated, regardless of the host buffer size.
- Raising the Minimum Modulation Refresh Rate enables more precise modulation, but it will also increase CPU usage.
- In cases where lower precision contributes to the character of a sound, increasing the precision may alter or diminish that character.
- Default Plugin Window Size
- Sets the window size in Ableton Live
- Note: This setting takes effect after restarting the plugin instance. Simply changing the setting will not resize the window.
Modulation
Each parameter with a [MOD] button provides its own Modulation Settings, with four independent modulation slots.

- Active: On/Off
- Source: Selects the modulation source, such as an Envelope, LFO, Macro, or MIDI message
- Shaper: Shows the modulation shaper
- Depth: Sets the modulation depth. This value also determines whether the parameter moves in the positive or negative direction
- Depth Mod Source: Selects the modulation source for "modulation depth." For example, this can be used to make a Macro increase or decrease the amount of LFO modulation
- Curve: Sets the curve for how modulation from Depth Mod Source is applied to the modulation depth.
Modulation Shaper
Each modulation slot has its own independent Modulation Shaper instance, allowing each modulation assignment to have its own response curve.
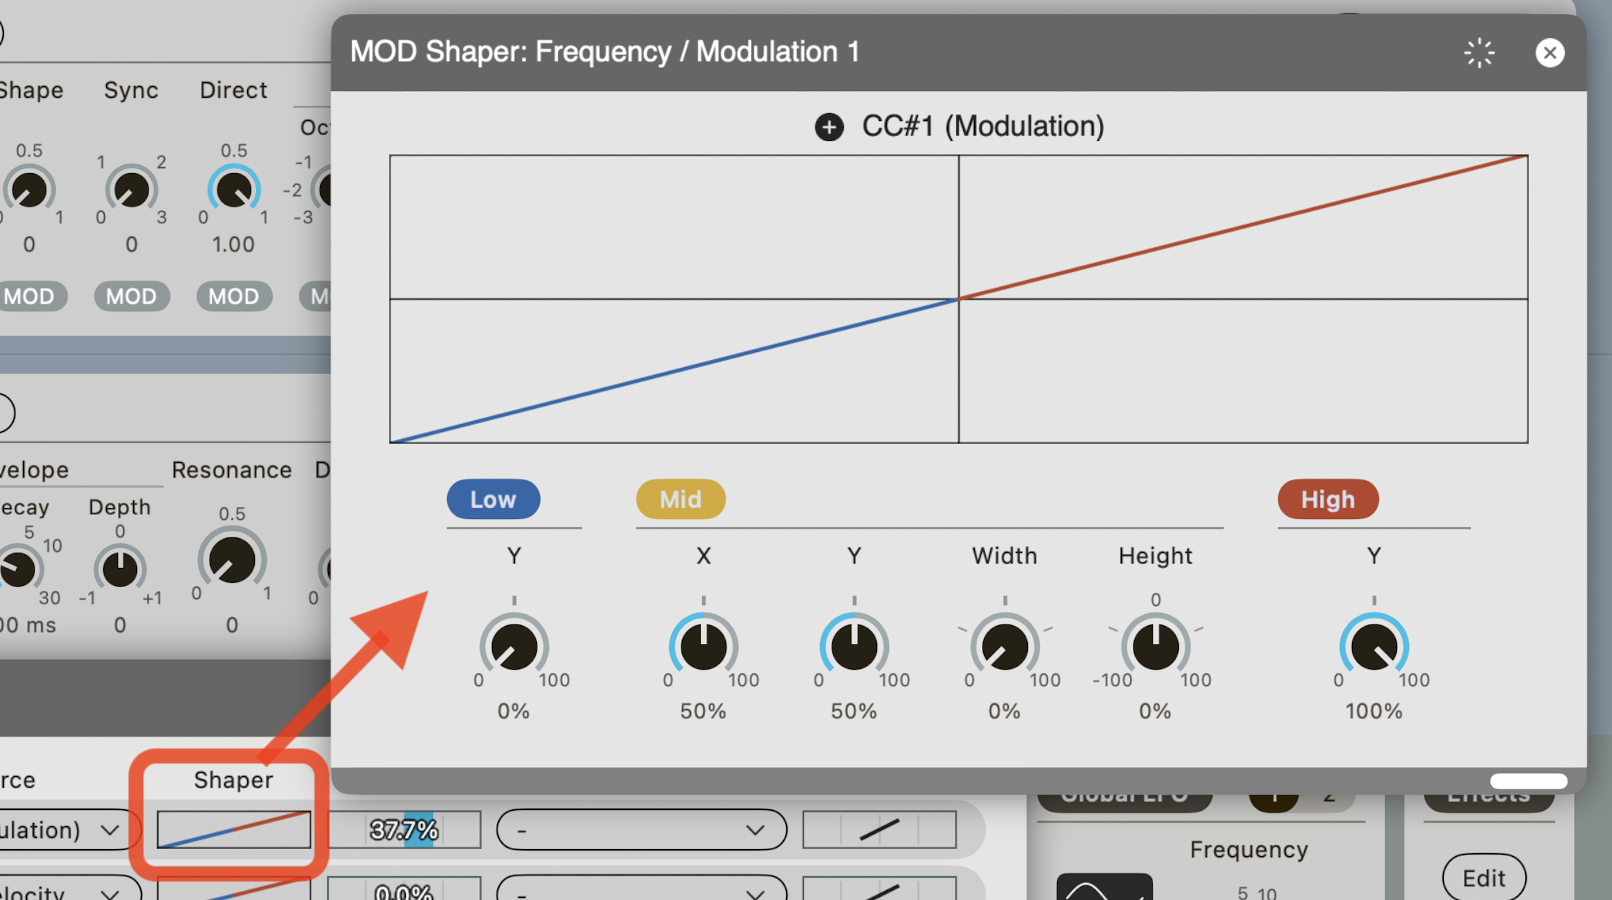
Changes the modulation values supplied by the modulation source.
- Low:
- Y: Sets how the lowest value of the modulation source is mapped
- Width: Sets the range from the lowest modulation source value over which the Low Y value is maintained
- Mid:
- X: Midpoint value of the modulation source
- Y: Sets how the midpoint value of the modulation source is mapped
- Width: Width of the middle region
- Height: Height of the middle region
- High:
- Y: Sets how the highest value of the modulation source is mapped
- Width: Sets the range from the highest modulation source value over which the High Y value is maintained
How to Control Parameters From an AU Host by Combining Macro and Modulation
To reduce load, this product limits the number of parameters exposed to AU hosts. Use Macros and Modulation to control non-exposed parameters. Macros are exposed to AU hosts.
- Press the MOD button to open Modulation View
- Turn the Active switch On
- Choose an unused Macro as the modulation source
- Adjust Depth. 100% is a good starting point
- From the AU host app, browse this product's parameters and control the macro parameter assigned in step 3
Synthesizer Parameters
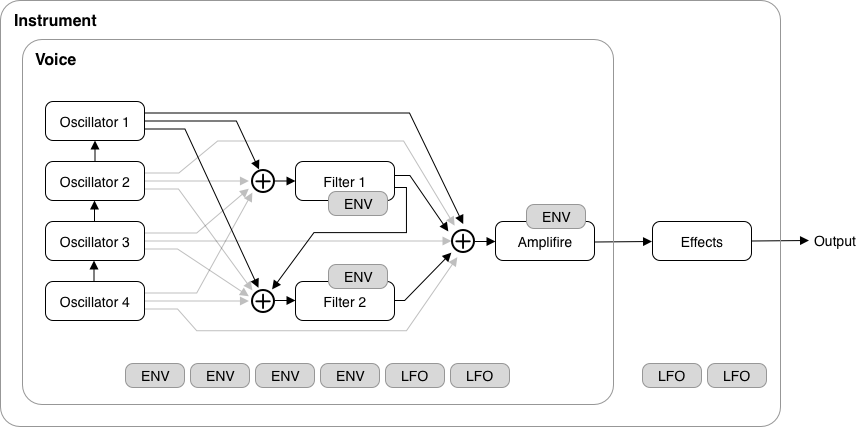
Mochizuki is a polyphonic synthesizer built around four oscillators.
Each voice contains four oscillators, two filters, and an amplifier. Signals generated by the oscillators are routed through the filters and amplifier, mixed together, and then passed through the effects section before being sent to the output.
The four oscillators not only operate independently, but are also connected in the order OSC4 → OSC3 → OSC2 → OSC1. Each oscillator can send its signal to the next oscillator in the chain, influencing its sound.
Monophonic and Polyphonic Components
Mochizuki contains both polyphonic and monophonic components. A polyphonic component has an independent instance for each voice, allowing every note to behave independently. Oscillators, filters, amplifiers, envelopes, and Poly LFOs are examples of polyphonic components.
A monophonic component has only a single shared instance for the entire synthesizer. Effects such as delay and reverb, as well as the Global LFOs, are monophonic components.
Because of this architecture, polyphonic modulation sources can modulate only polyphonic parameters. In contrast, monophonic modulation sources can modulate both polyphonic and monophonic parameters, including effect parameters.
Polyphonic Modulators
Mochizuki provides four general-purpose envelopes, two filter envelopes, one amplifier envelope, two Poly LFOs, two Step Sequencers, and several Per-Note Expression sources. These modulators operate independently for each voice, allowing every note to have its own modulation. Per-Note Expression sources include Note Pitch Bend, Note Slide, Note Pressure, Note On Velocity, Note Off Velocity, Note Position, and Note Pitch.
Monophonic Modulators
Mochizuki also provides three Global LFOs. These modulators are shared by the entire synthesizer, applying the same modulation to every voice. Macro controls and MIDI messages received on the master channel, such as CC#1, Pitch Bend, and Pressure, are also treated as monophonic modulation sources.
Modulation Source List
- Macro 1 .. 16 : MONO
- CC#1 (Master Channel) : MONO
- Pitch Bend (Master Channel) : MONO
- Pressure (Master Channel) : MONO
- Note Pitch : POLY
- Note Position : POLY
- Note On Velocity : POLY
- Note Off Velocity : POLY
- Note Pitch Bend : POLY
- Note Slide : POLY
- Note Pressure : POLY
- Envelope 1 .. 4 : POLY
- Filter Envelope 1 .. 2 : POLY
- Amp Envelope : POLY
- Global LFO 1 .. 3 : MONO
- Poly LFO 1 .. 2 : POLY
- Step Sequencer 1 .. 2 : POLY
Each modulation source can be assigned to parameters using the modulation assignment screen, which opens when you press the [MOD] button next to a parameter.
OSC (Oscillator)
Signal flows through the oscillators from the higher-numbered oscillator toward the lower-numbered oscillator. How that signal is processed depends on the oscillator type.
Use the Input dial at the left edge of the OSC section to set how much of the incoming signal is received. Each oscillator output can be sent individually to Filter 1, Filter 2, and AMP.
Oscillator Type

- Active: On/Off
- Oscillator Type: Selects the oscillator type for the chosen number.
- AM (Amplitude Modulation)
- FM (Frequency Modulation)
- Noise (Pitched Noise)
- Resonator: Uses noise and texture sources as input to the resonator
Oscillator Selection Buttons (upper right of the oscillator group)
Selects which of the four oscillators is shown on the screen.
Common Oscillator Parameters
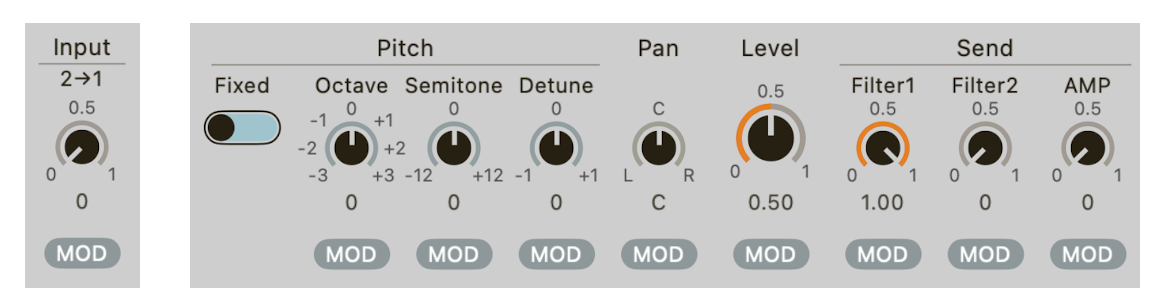
- Input: Input level from the next-numbered oscillator.
- Pitch: Adjusts oscillator pitch
- Fixed: When On, the oscillator does not follow MIDI notes and sounds at the fixed frequency specified by Freq
- Freq: Sets the frequency. Available when Fixed is On
- Octaves: Octave offset relative to MIDI input. Available when Fixed is Off
- Semitone: Semitone offset relative to MIDI input. Available when Fixed is Off
- Detune: Fine adjustment within a range of one semitone up or down
- Pitch Quantize:
Quantizes modulation applied to the Octaves and Semitone parameters in semitone increments.
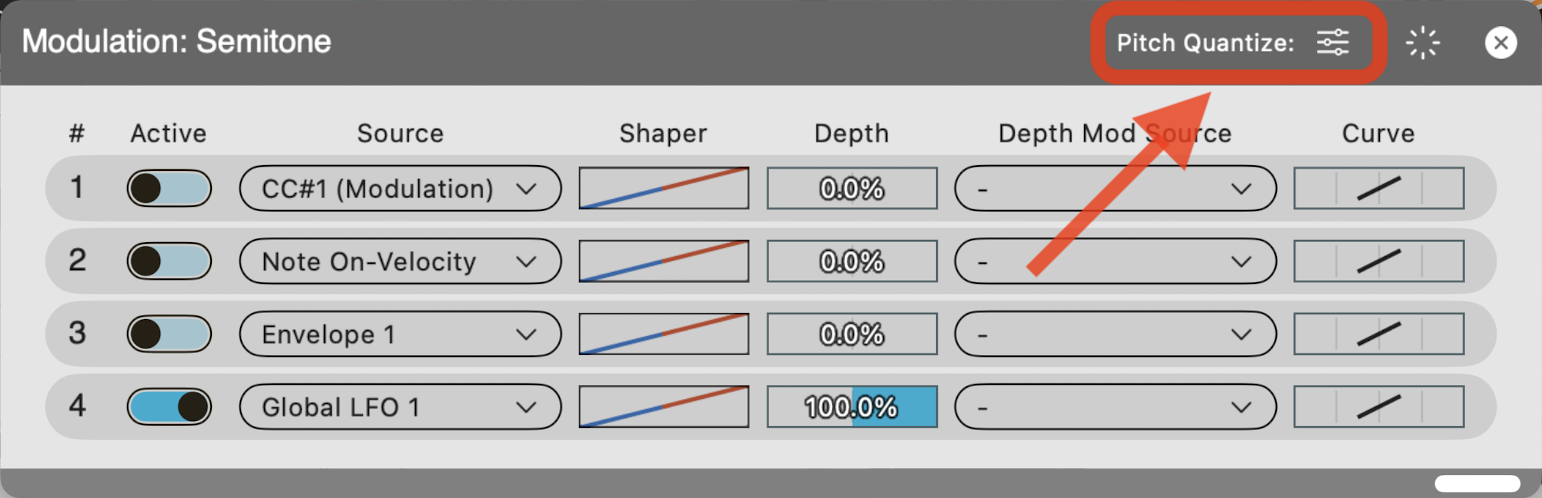
Press the [MOD] button for either the Octaves or Semitone parameter to display this screen.
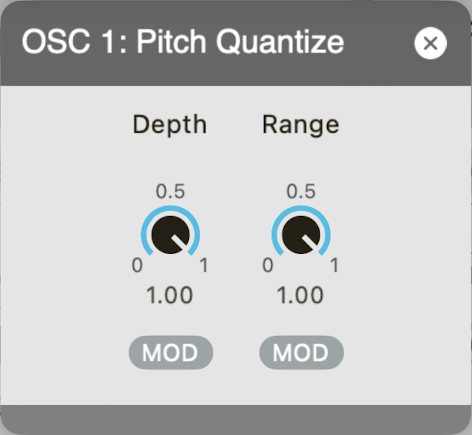
- Depth: Quantization depth
- Range: Range to quantize
- Pan: Left-right balance
- Level: Volume. Output to other oscillators is not affected by this value
- Send:
- Filter 1: Volume sent to Filter 1
- Filter 2: Volume sent to Filter 2
- AMP: Volume sent to AMP
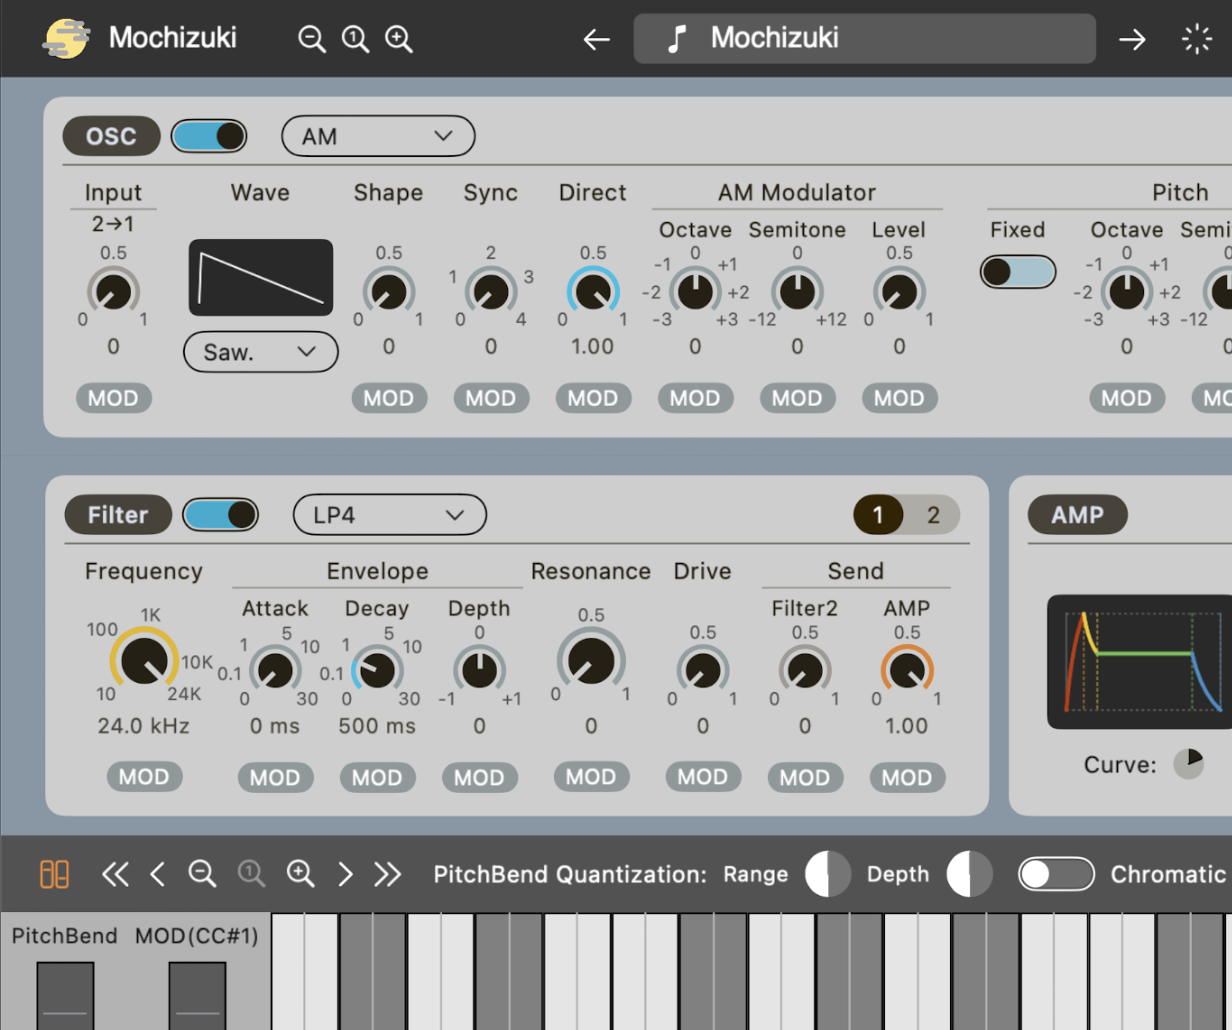
AM (Amplitude Modulation)

An oscillator that generates standard synthesizer waveforms and includes a sub-oscillator for AM modulation. The signal from Input, together with the AM sub-oscillator, amplitude-modulates the main oscillator.

- Wave: Waveform selection.
- Sawtooth
- Pulse
- Triangle
- Sine
- Shape: Waveform adjustment. Changes the waveform shape and adjusts harmonic content
- Sync: Oscillator sync frequency. Higher values add sharp harmonic changes caused by sync
- Direct: Volume of the unmodulated signal. Sets how much of the original oscillator sound is mixed with the AM-modulated sound
- AM OSC: Sub-oscillator for AM
- Octave: Octave offset of the sub-oscillator
- Semitone: Semitone offset of the sub-oscillator
- Level: Sub-oscillator volume
FM (Frequency Modulation)

A two-operator FM oscillator. The signal from Input becomes FM input to the carrier.

- Ext.In: Selects whether the audio signal from the next-numbered oscillator is routed to the carrier or the modulator.
- Wave: Carrier waveform selection

- Width: Carrier waveform width. Changes the width of the waveform and alters the harmonic content
- Bend: Carrier waveform curvature. Bends the waveform and alters the harmonic content
- Feedback: Carrier self-feedback. Higher values add harmonics and create a rougher sound
- Modulator:
- Coarse: Coarse modulator frequency ratio relative to the carrier
- Fine: Fine modulator frequency ratio relative to the carrier
- Level: Modulator volume. Acts as FM modulation depth; higher values create larger harmonic changes
- Modulator Detail:
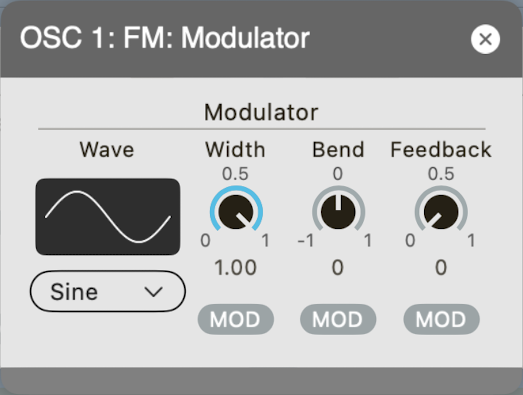
- Wave: Modulator waveform selection
- Width: Modulator waveform width
- Bend: Modulator waveform curvature
- Feedback: Modulator self-feedback. Adds complex harmonics to the FM input itself
Noise

A noise oscillator that can create pitched noise using a pitch-controlled band-pass filter.

- Color: Adjusts the frequency balance of the noise, from pink through white to blue
- Downsample:
- Rate: Downsampling frequency
- Mix: Downsampled sound volume
- Mix: Adjusts the balance between the Noise and Crackle signals
- Crackle:
- Level: Crackle noise volume
- Decay: Decay time of each crackle noise event
- Density: Crackle noise density
- Resonance: Controls how strongly the band-pass filter emphasizes frequencies around the pitch-defined center frequency. At 0, the filter is bypassed
Resonator

A resonator with noise and texture waves. The signal from Input becomes input to the resonator.

- Noise: Shows the Noise settings screen. Adjust white noise, downsampling, Burst, and Crackle
- Texture: Shows the Texture settings screen. Set playback of recorded texture waveforms
- Resonator: Switches the resonator On/Off. When Off, Noise and Texture signals are output as-is.
- HPF: Cutoff frequency of the high-pass filter
- LPF: Cutoff frequency of the low-pass filter
- APF: All-pass filter
- Feedback: Feedback amount
- Ratio: Frequency ratio relative to Pitch
- Comb Filter: Comb filter
- Feedback: Feedback amount
- Filter: Filter in the feedback path. Adjusts the brightness and texture of the feedback component
- Drive: Saturation amount in the feedback path
Noise
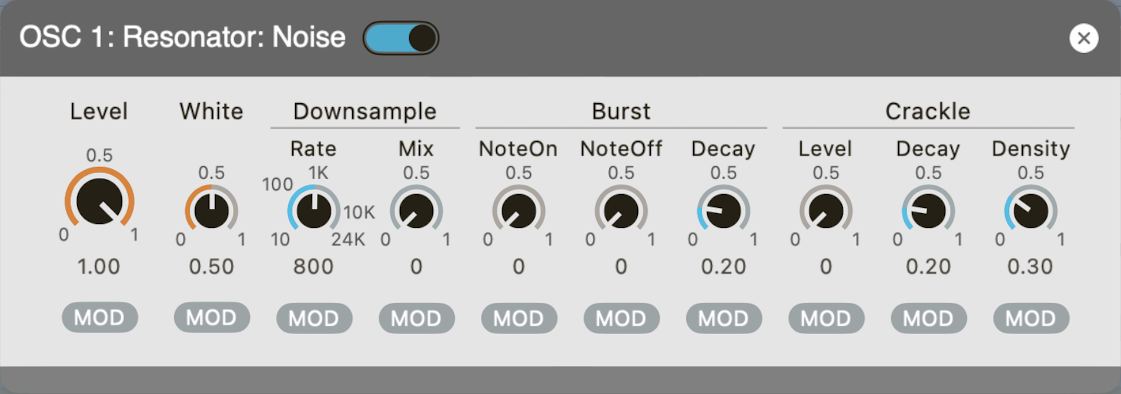
- Active: On/Off
- Level: Overall Noise volume
- Noise: Noise volume
- Color: Adjusts the frequency balance of the noise, from pink through white to blue
- Downsample:
- Rate: Downsampling frequency
- Mix: Downsampled sound volume
- Burst: Generates attack noise at Note On/Off timing
- NoteOn: Volume at Note On
- NoteOff: Volume at Note Off
- Decay: Decay time of the attack noise
- Crackle:
- Level: Crackle noise volume
- Decay: Decay time of each crackle noise event
- Density: Crackle noise density
Texture
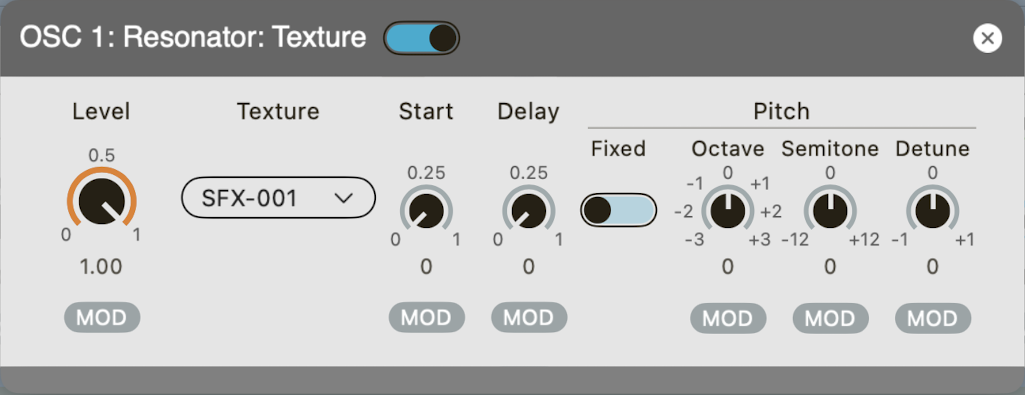
Plays recorded waveforms as texture sources.
- Active: On/Off
- Level: Volume
- Texture: Selects the texture
- Start: Texture playback start position
- Delay: Delay time from Note On to playback start
- Repeat: Repeats texture playback
- Times: Number of repeats
- Tempo: Tempo sync On/Off
- Frequency: Repeat frequency (when tempo sync is Off)
- Period: Repeat period (when tempo sync is On)
- Pitch: Texture-specific pitch
- Fixed: Fixes the texture pitch
- Octave: Octave offset relative to resonator pitch
- Semitone: Semitone offset relative to resonator pitch
- Detune: Fine pitch adjustment
Filter

- Active: On/Off
- Type:
- LP1: 1st-order low-pass
- LP2: 2nd-order low-pass
- LP3: 3rd-order low-pass
- LP4: 4th-order low-pass
- HP1: 1st-order high-pass
- HP2: 2nd-order high-pass
- HP3: 3rd-order high-pass
- HP4: 4th-order high-pass
- BP1: 1st-order band-pass
- BP2: 2nd-order band-pass
- Notch2: 1st-order notch / band-stop
- Notch3: 2nd-order notch / band-stop
- Frequency: Cutoff or center frequency, depending on the filter type
- Envelope: Envelope applied to cutoff frequency
- Attack: Time for the envelope to rise after Note On
- Decay: Time for the envelope to return after Attack
- Depth: Depth of envelope modulation
- Resonance: Resonance amount. Emphasizes the area around the cutoff frequency
- Drive: Saturation amount. Adjusts the distortion character at the filter input or inside the filter
- Send:
- Filter2: Volume sent to Filter 2
- AMP: Volume sent to AMP
AMP (Amplifier)
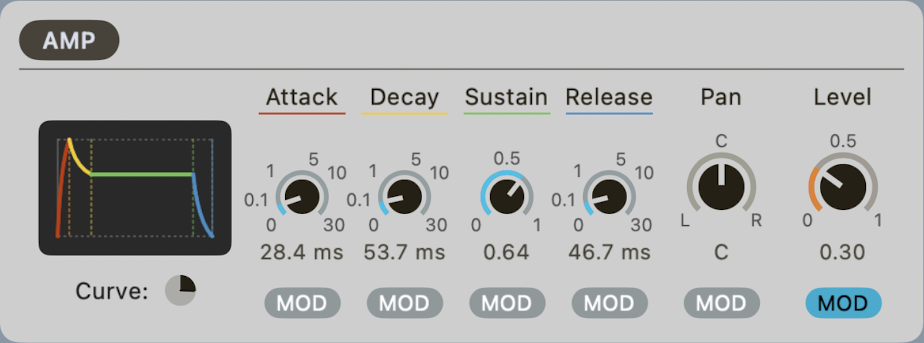
- Attack: Time from Note On until the maximum level is reached
- Decay: Time from the maximum level to the Sustain level
- Sustain: Volume held while the key is pressed
- Release: Time for the sound to fade out after Note Off
- Curve: Adjusts the shape of the volume envelope.
- Pan: Left-right position
- Level: Volume
MOD (Modulation)
ENV (Envelope Generator)
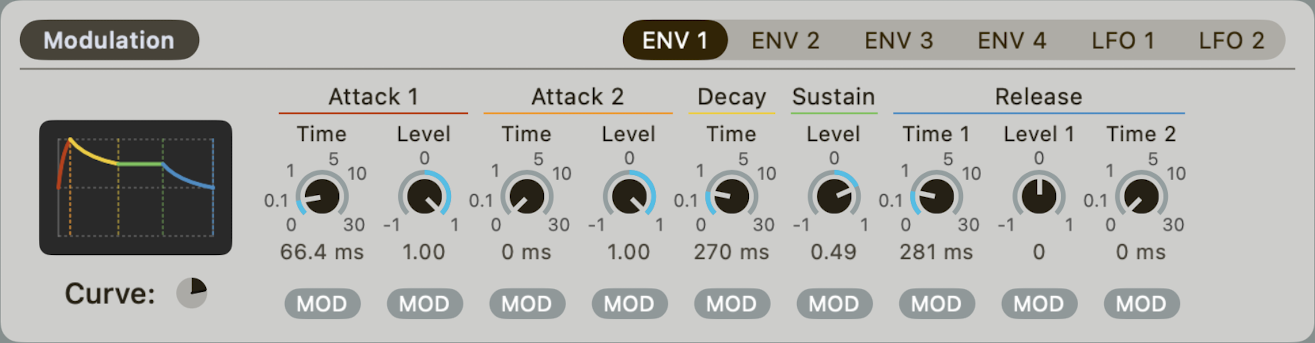
- Curve: Adjusts the envelope curve from linear to shapes that emphasize the attack or decay.
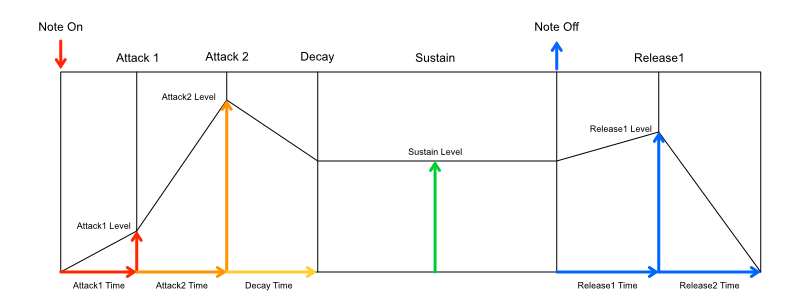
- Attack 1: First attack segment immediately after Note On
- Time: Attack 1 time
- Level: Target level for Attack 1
- Attack 2: Second attack segment following Attack 1
- Time: Attack 2 time
- Level: Target level for Attack 2
- Decay: Time to move to the Sustain level after Attack
- Sustain: Level held while Note On continues
- Release: Decay segment after Note Off
- Time 1: Time for the first half of Release
- Level 1: Target level for the first half of Release
- Time 2: Time for the second half of Release
- Because the envelope is a polyphonic modulator, it cannot be used as a modulation source for monophonic parameters.
LFO (Low Frequency Oscillator)
Like the envelope generator, this LFO is a polyphonic modulator that has an instance for each sounding note. It cannot be used as a modulation source for monophonic parameters. Use the Global LFO described below for LFO modulation of monophonic parameters.
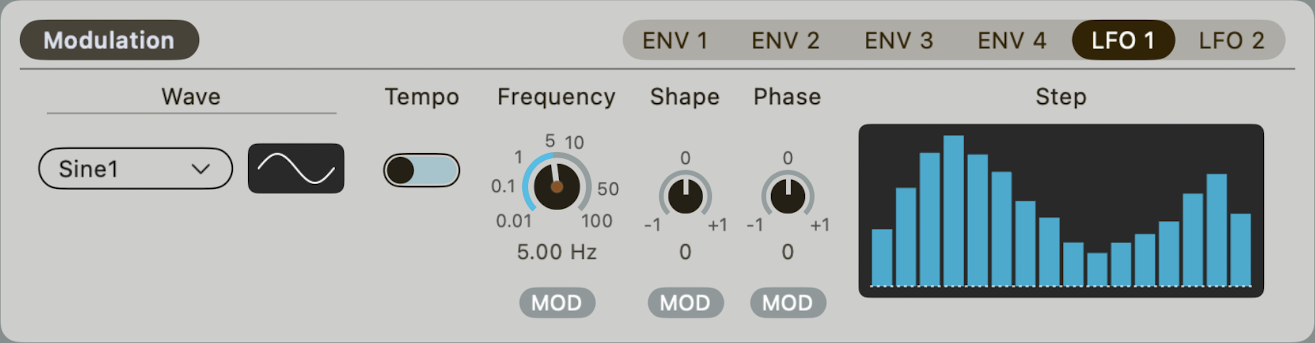
- Wave: Waveform selection
- Tempo: Tempo sync On/Off
- Frequency: LFO frequency (when tempo sync is Off)
- Period: LFO period (when tempo sync is On)
- Shape: Adjusts the waveform shape
- Phase: Phase at Note On. Sets where in the LFO waveform playback starts when a note begins
- MonoPole: Outputs only positive modulation values by shifting the waveform into the positive range.
- Step: Modulation level for each cycle. Use this to create stepped changes or per-cycle intensity changes. Long-press to enter detailed setting mode.
Step Sequencer
A polyphonic step sequencer that outputs a separate modulation sequence for each sounding note.
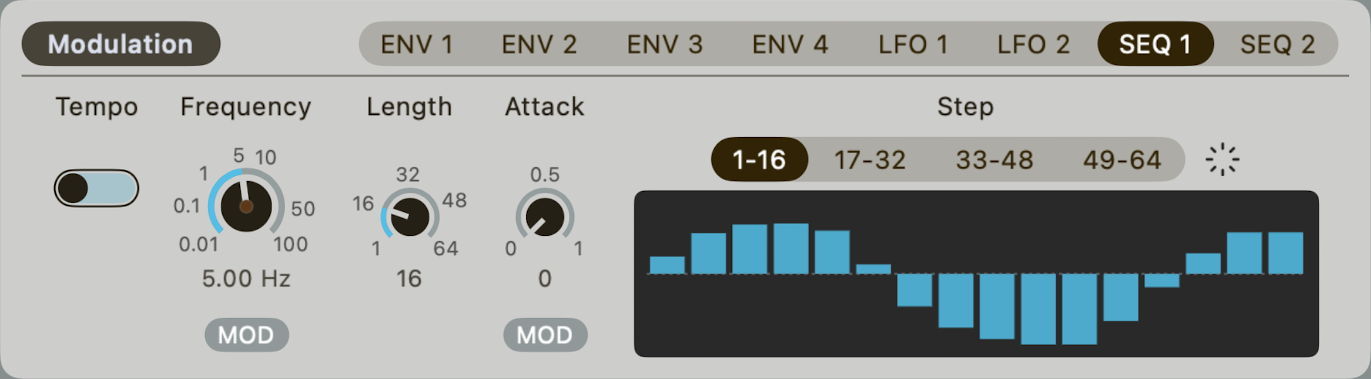
- Tempo: Tempo sync On/Off
- Frequency: Sequence playback frequency (when tempo sync is Off)
- Period: Sequence playback period (when tempo sync is On)
- Length: Number of steps in the sequence
- Attack: Time for the sequence modulation to reach its full level after Note On
- Step: Modulation level for each step. Select a range above the editor, then drag the bars to set their levels.
Global LFO
The Global LFO is not instantiated for each sounding note; it is a single monophonic modulator.
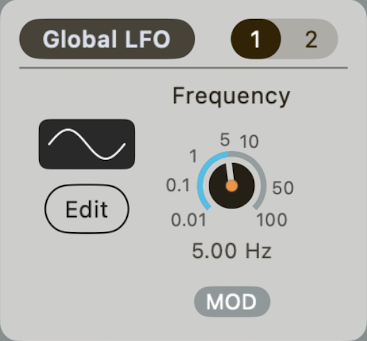
- Wave: Waveform selection
- Frequency: LFO frequency (when tempo sync is Off)
- Period: LFO period (when tempo sync is On)
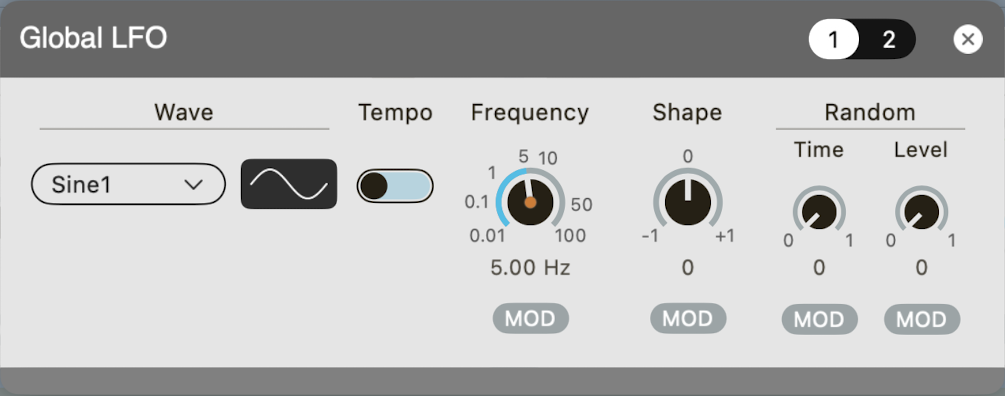
- Wave: Waveform selection
- Tempo: Tempo sync On/Off
- Frequency: LFO frequency (when tempo sync is Off)
- Period: LFO period (when tempo sync is On)
- Shape: Adjusts the waveform shape
- MonoPole: Outputs only positive modulation values by shifting the waveform into the positive range.
- Random: Randomization settings for each cycle
- Time: Randomizes the cycle period
- Level: Randomizes the amplitude
Effects
Amplifier
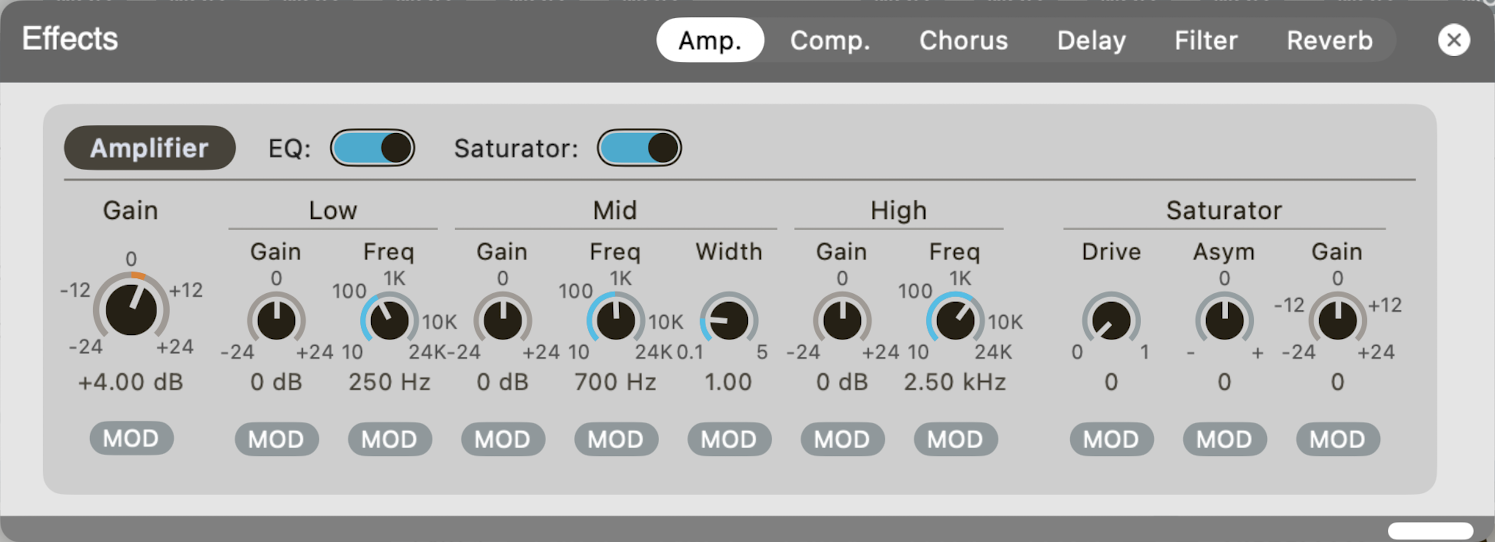
- Gain: Overall volume entering the effects section. This is the same as Gain in the effects panel in the main area.
- EQ: Equalizer
- Active: On/Off
- Low: Low range
- Gain: Volume
- Freq: Frequency
- Mid: Mid range
- Gain: Volume
- Freq: Frequency
- Width: Width of the mid range. Smaller values adjust a narrower band, while larger values adjust a wider band
- High: High range
- Gain: Volume
- Freq: Frequency
- Saturator:
- Active: On/Off
- Drive: Saturation amount. Higher values create stronger distortion
- Asym: Adjusts waveform asymmetry, affecting the amount of even-order harmonics.
- Gain: Volume after the Saturator
Compressor
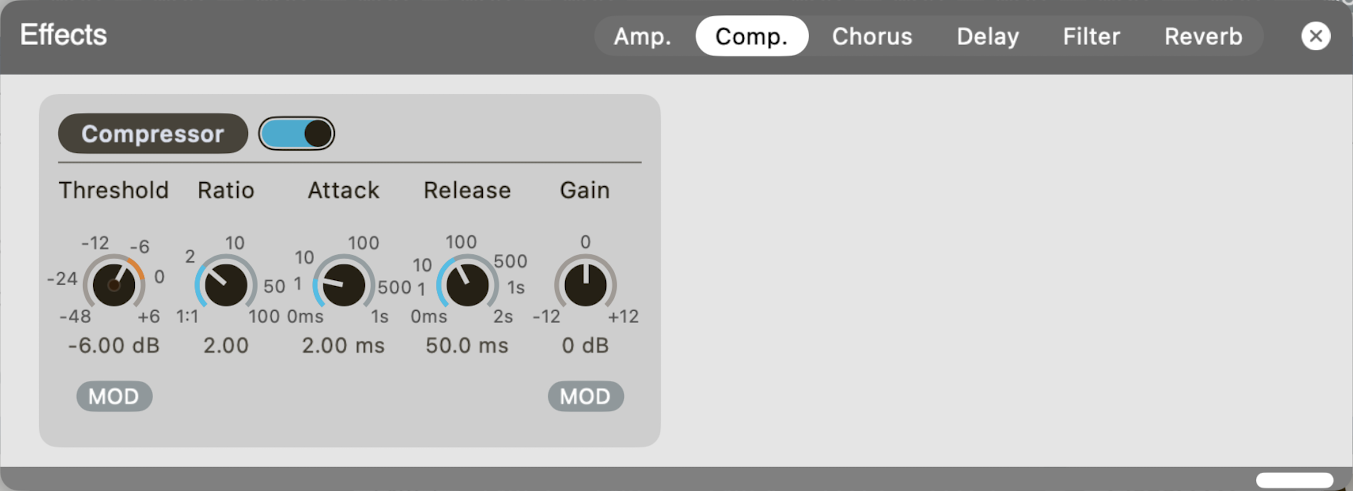
- Active: On/Off
- Threshold: Adjusts the input signal level and sets the point where signal-level compression starts. During compression, the lamp inside the knob lights up.
- Ratio: Adjusts the signal-level compression ratio. Turning the knob to the right increases the compression ratio.
- Attack: Time from the start of compression until the target compression ratio is reached.
- Release: Time after the input signal falls below the threshold level until the compression ratio returns to 1.
- Gain: Volume after compression
Chorus
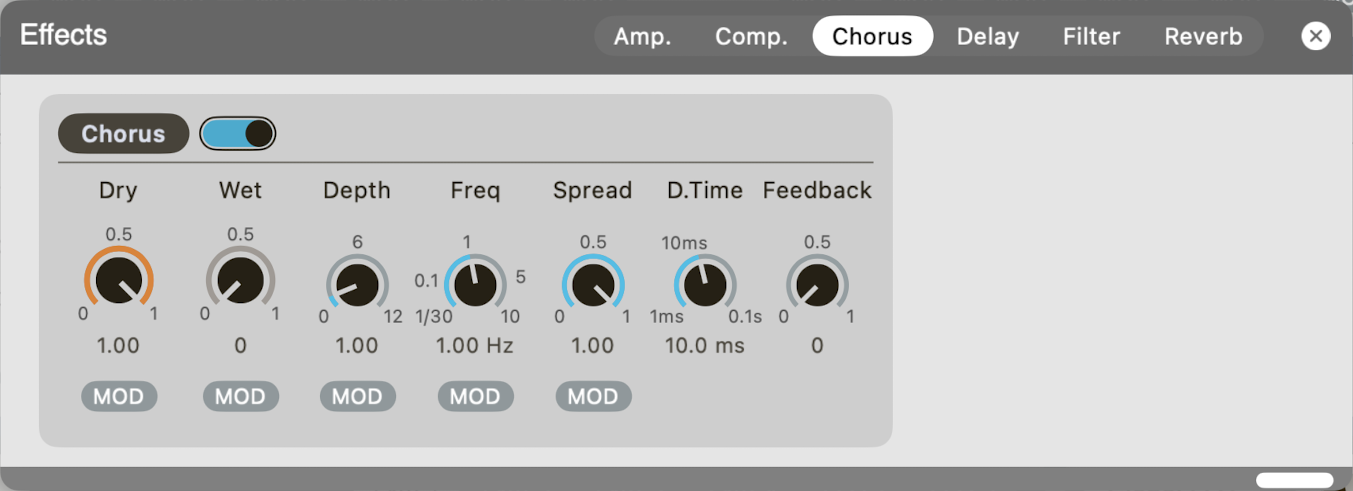
- Active: On/Off
- Dry: Dry signal volume
- Wet: Wet signal volume
- Depth: Effect depth
- Freq: Modulation speed
- Spread: Stereo width. Adjusts left-right modulation phase and spaciousness
- D.Time: Delay Time. Sets the internal delay time of the chorus
- Feedback: Feedback amount
Delay
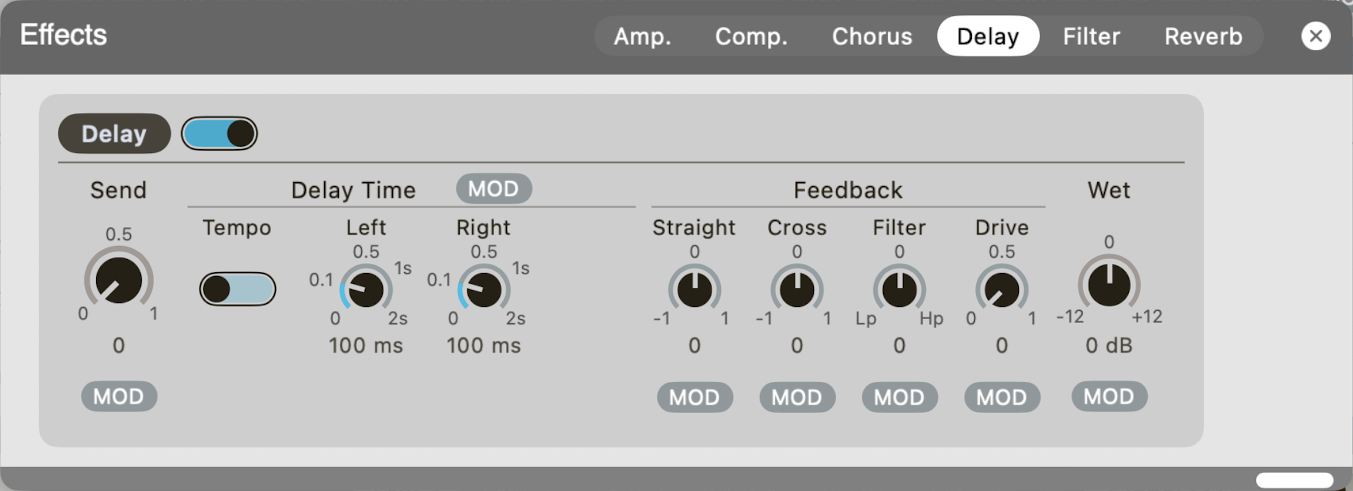
- Active: On/Off
- Send: Volume sent to the effect
- Delay Time:
- Tempo: Tempo sync On/Off
- Left: Left channel delay time
- Right: Right channel delay time
- Feedback:
- Straight: Straight feedback amount
- Cross: Cross feedback amount
- Filter: Filter cutoff frequency in the feedback path
- Drive: Saturation amount
- Wet: Delay sound volume
Filter
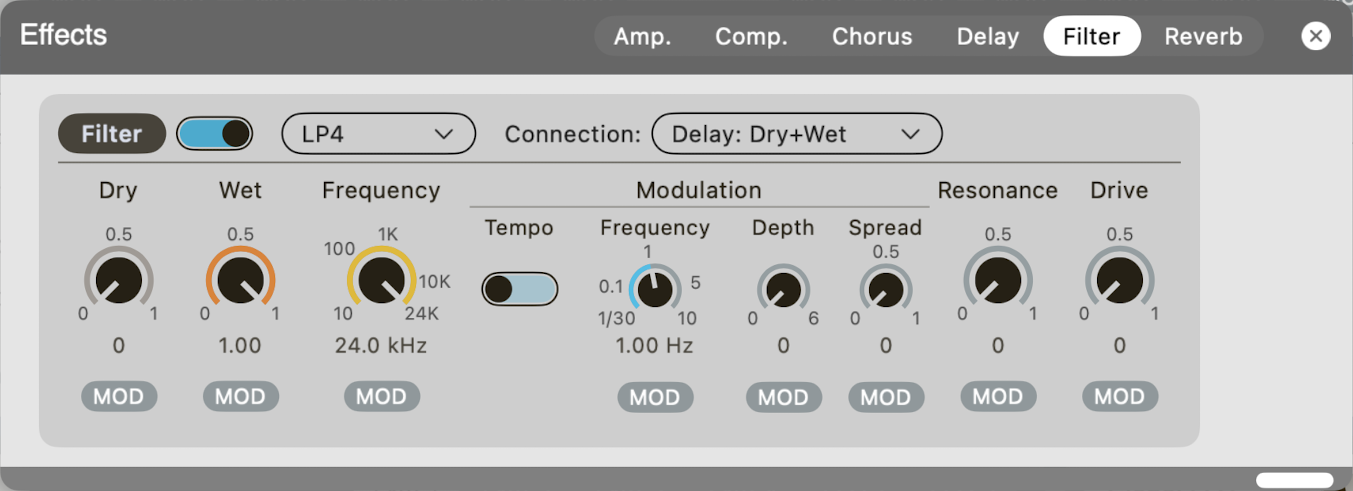
- Active: On/Off
- Dry: Dry signal volume
- Wet: Wet signal volume
- Frequency: Cutoff frequency
- Modulation: Cutoff frequency modulation
- Tempo: Tempo sync On/Off
- Frequency, Period: Modulation speed
- Depth: Modulation depth
- Spread: Left-right modulation phase
- Resonance: Resonance amount
- Drive: Saturation amount
Reverb
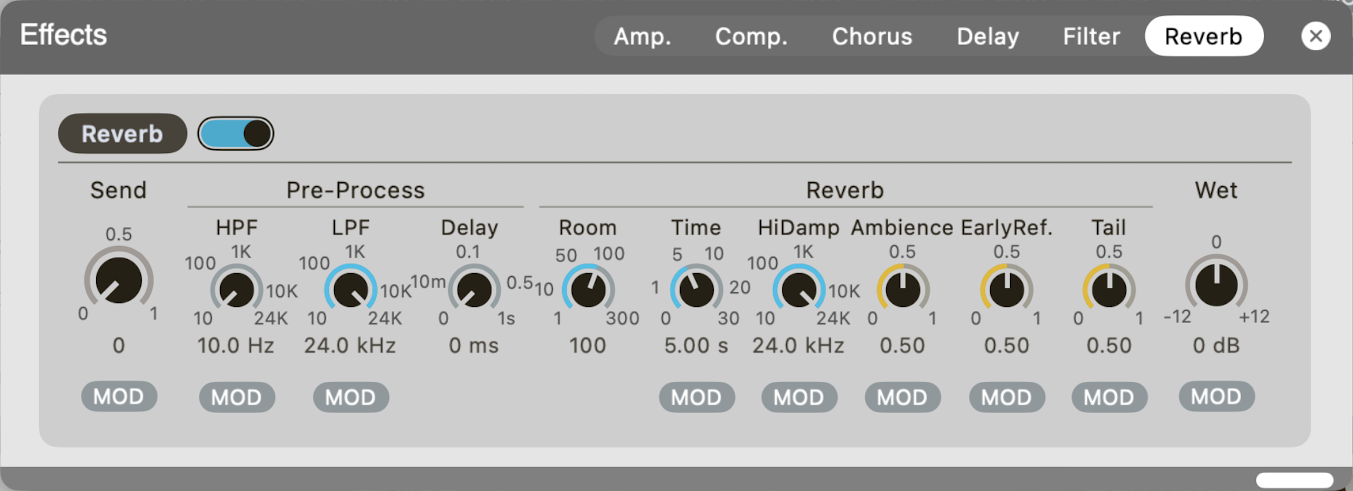
- Active: On/Off
- Send: Volume sent to the effect
- Pre-Process:
- HPF: Cutoff frequency of the high-pass filter
- LPF: Cutoff frequency of the low-pass filter
- Delay: Predelay. Sets the delay time from the original sound until the reverb starts
- Reverb:
- Room: Sets the size of the virtual space
- Time: Reverb time
- HiDamp: High-frequency damping rate
- Ambience: Ambience volume
- EarlyRef.: Early Reflections volume
- Tail: Tail volume
- Wet: Wet signal volume